Guangzhou Wuxinji Network Technology Co., Ltd. was founded in 2016, and is jointly built by more than 100 front-line maintenance experts. It has made remarkable achievements in the industry and will create more brilliant achievements. This document describes the detailed function introduction of the Wuxinji maintenance manual and defines the module division
The Wuxinji platform provides a large number of resources, such as professional mobile phone point maps, fine maps, main board diagrams, schematic diagrams, block diagrams, basic knowledge, ground resistance, and maintenance plans, and is committed to creating a platform with zero basic repair of all mobile phones. Wuxinji software is available for customers to download, disseminate and use some functions for free, and VIP members who purchase it have more access to functions
Introduction to Functions of Wuxinji Platform
Intro
Introduction English version

Initial knowledge of software
+
Download and installation of Wuxinji software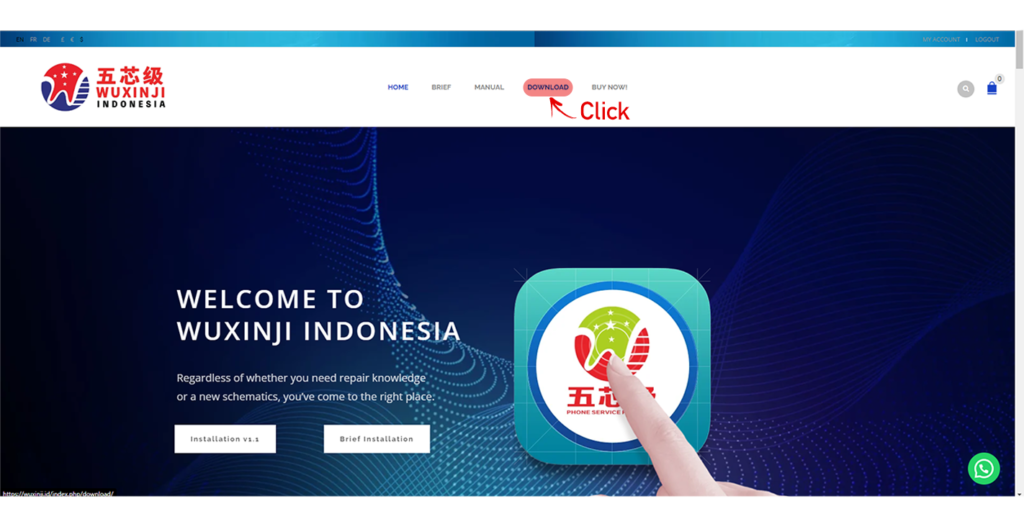
- Visit Wuxinji official website Indonesia and find the software download in the navigation bar and select indonesia version.
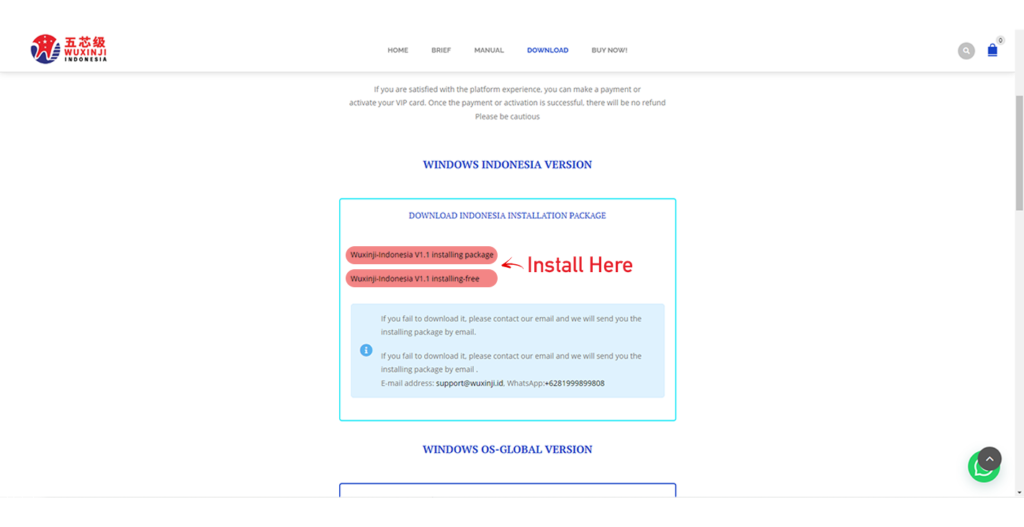
- Go to the download link page and select Wuxinji – Repair Manual Installation Package V1.1 (downloaded from Indonesia servers)

- Downloading, find the installation package and install
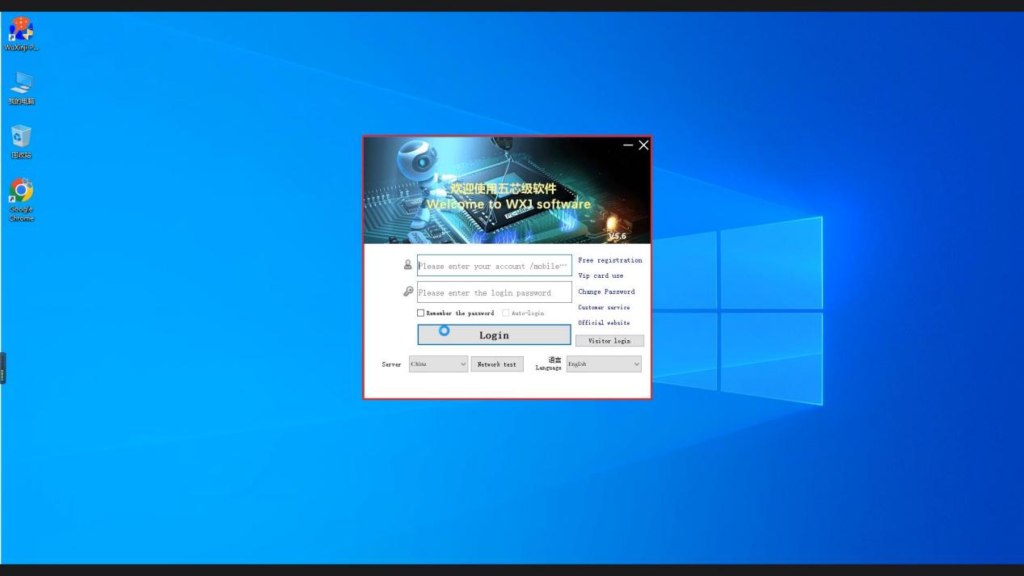
- After the installation is completed, find the Wuxinji shortcut key on the desktop, double-click to open, and you can enter the login interface
+
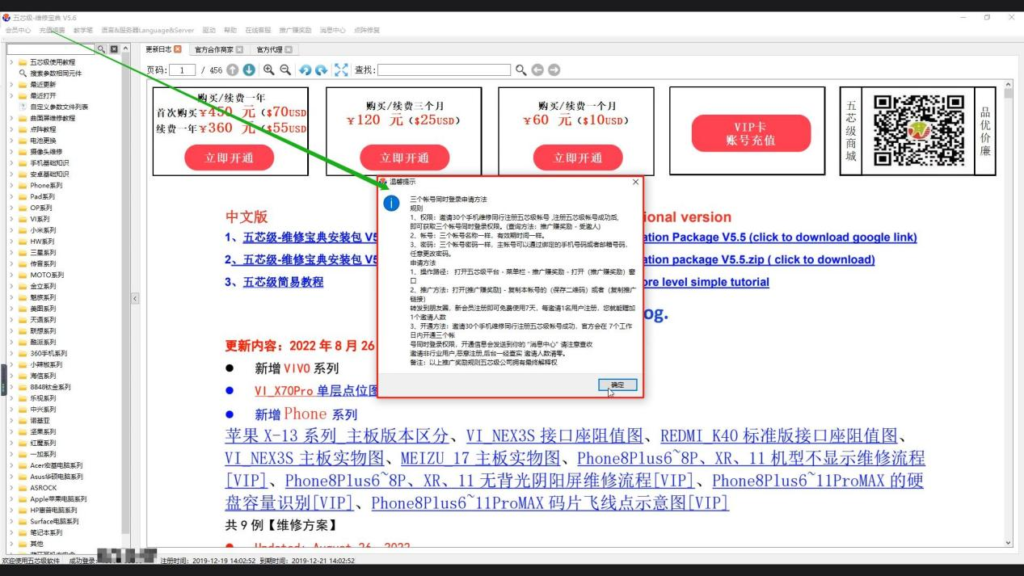
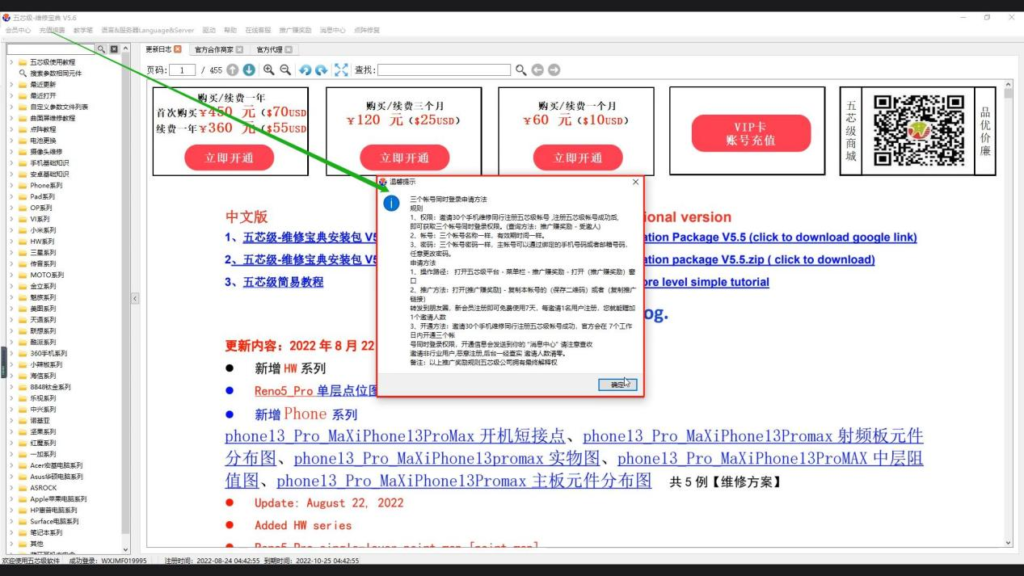
Free registration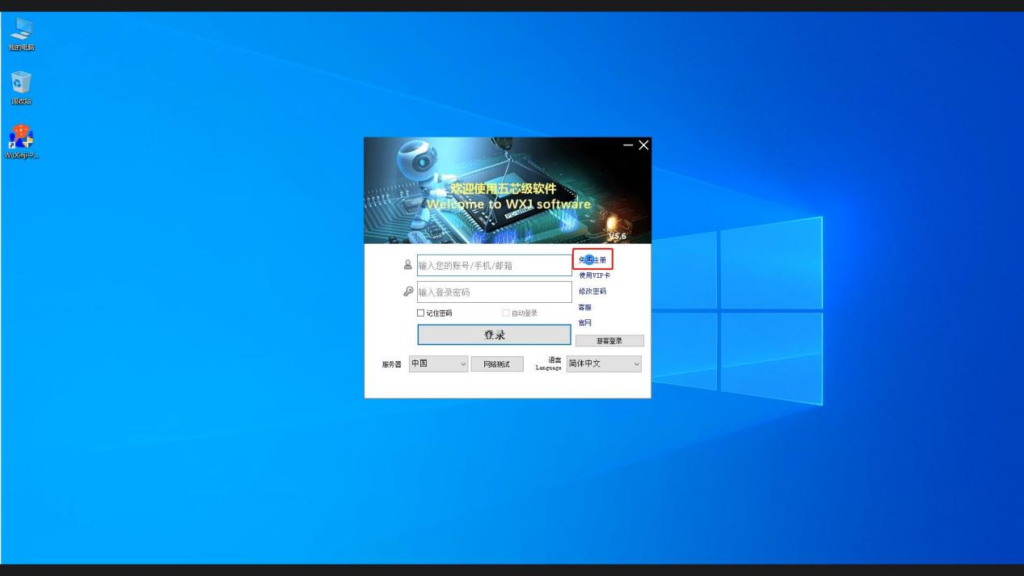
- Find the Wuxinji shortcut key, double-click to open, and find free registration
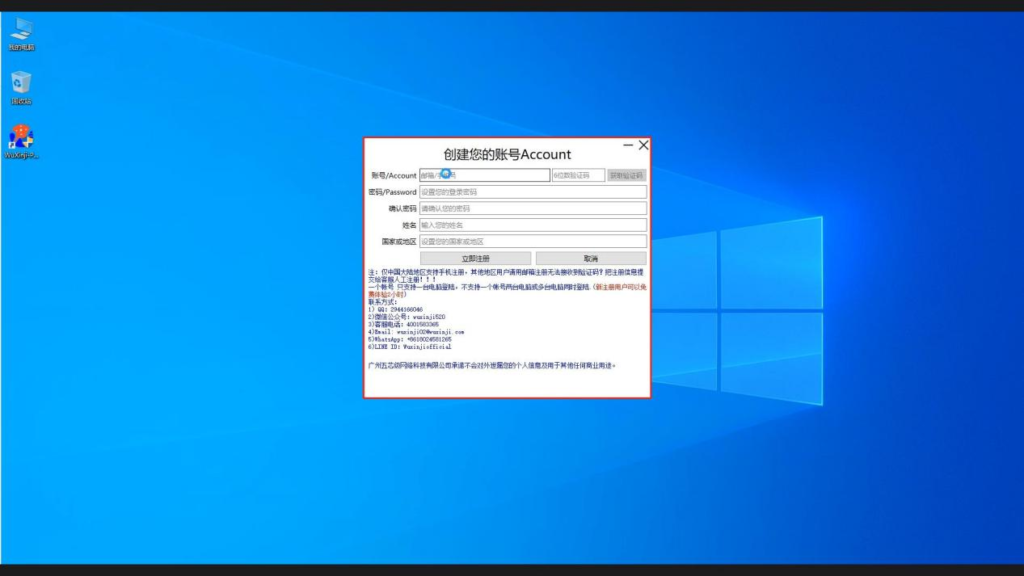
- Enter the Create Account page and fill in the information according to the page content. [The password length must be 6-16 digits. If the password is incorrect,
you cannot enter the main interface. Users who forget the password can reset the new password by modifying the password (exclusive for VIP cards)]
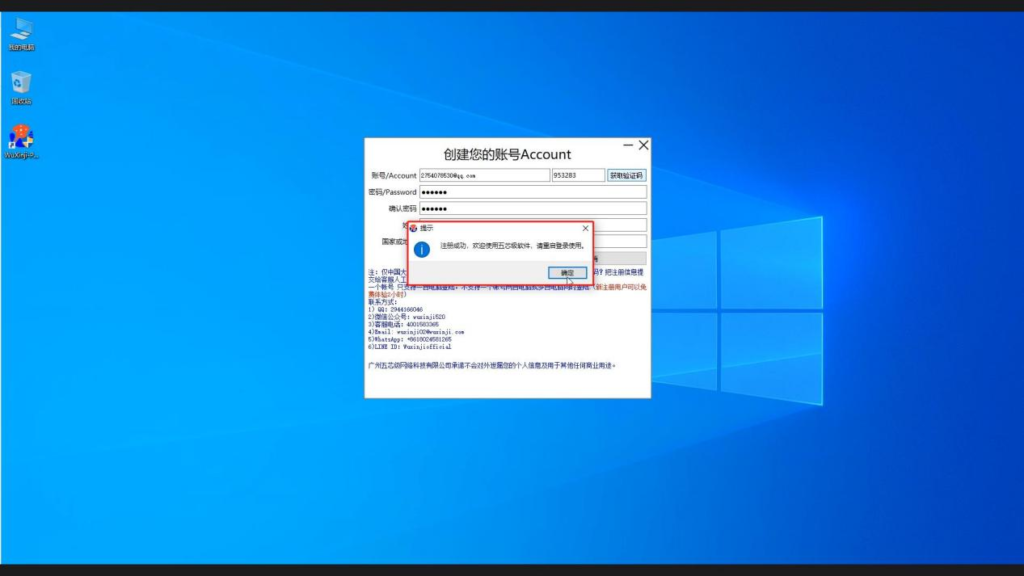
- After filling in the form, click Register Now, and a page will pop up indicating that the registration is successful. Click OK to return to the desktop

- Double click the Wuxinji shortcut key to enter the login interface, enter the account and password, and log in
+
Server language selection and user personal information improvement
- Double click the Wuxinji shortcut key to enter the login interface. Click Network Test, and the system will automatically
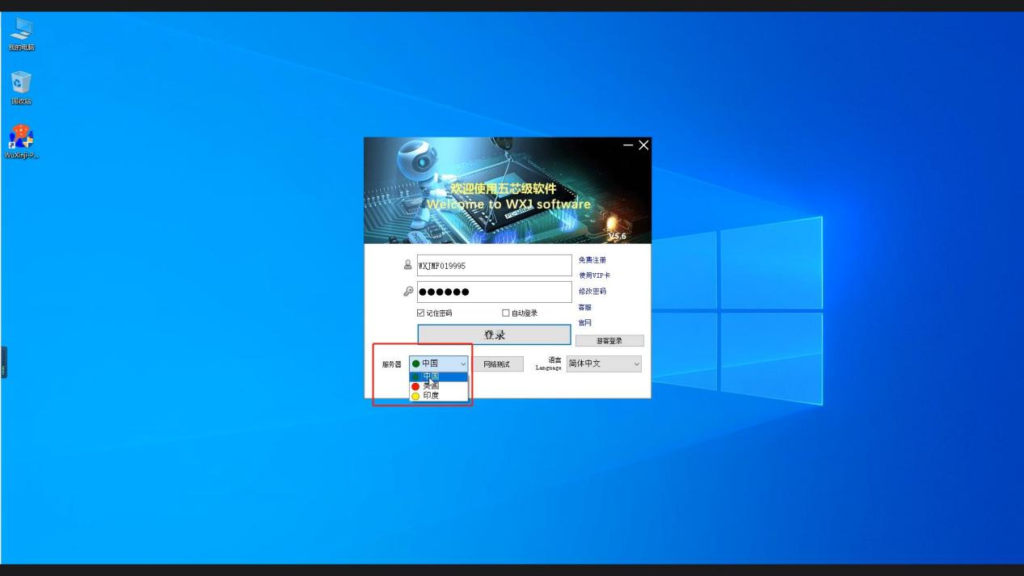
- After the network test, click the server, and you will see that the circles in front of the three options have different colors.
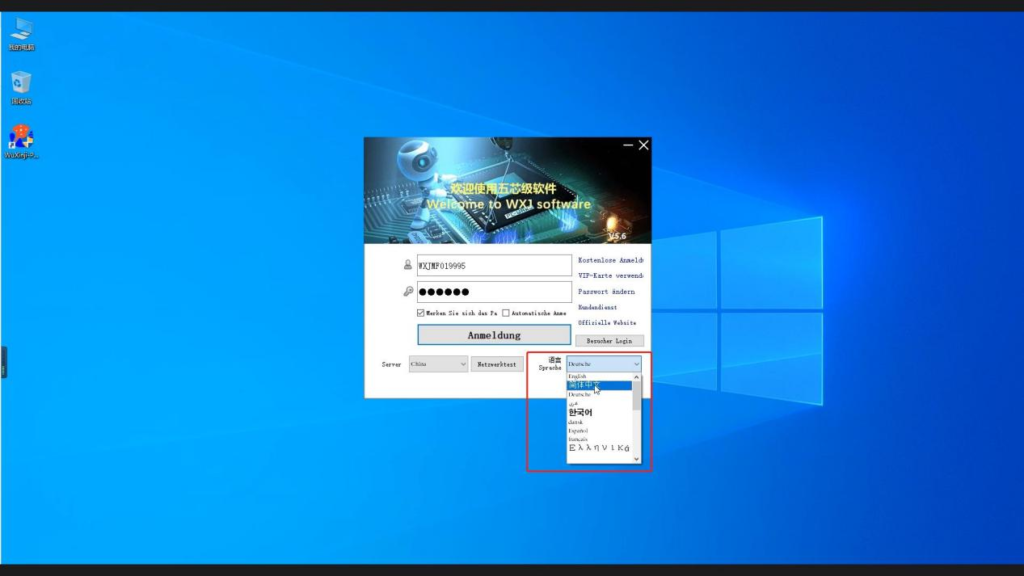
- Click the language option. There are many languages available in the option box. Find the appropriate language and click it
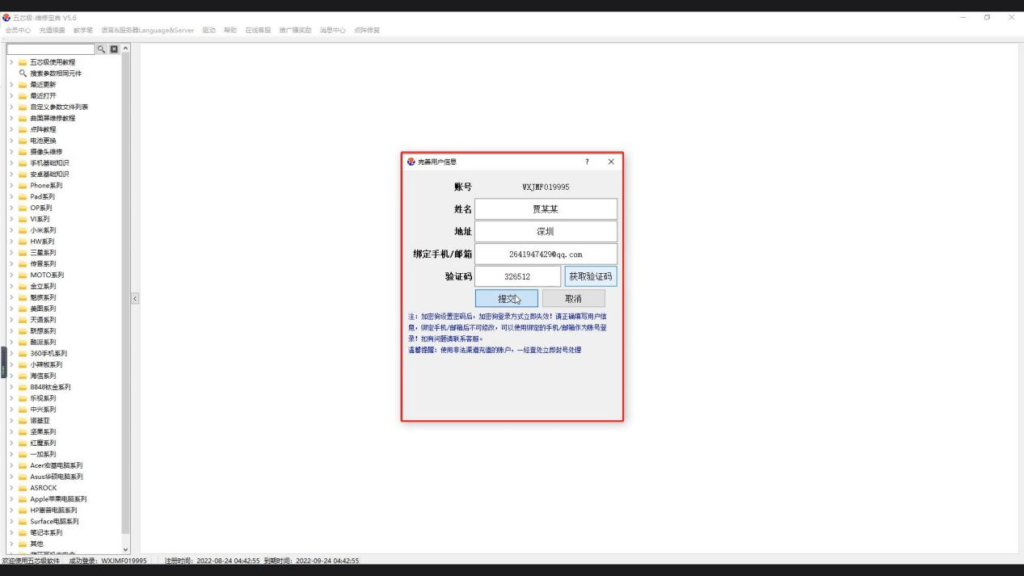 When you enter the Wuxinji level repair manual interface for the first time, the system will pop up the “Improve User Information” interface, and we can fill in according to the page prompts. After filling, the system will prompt to restart the software, and we will restart
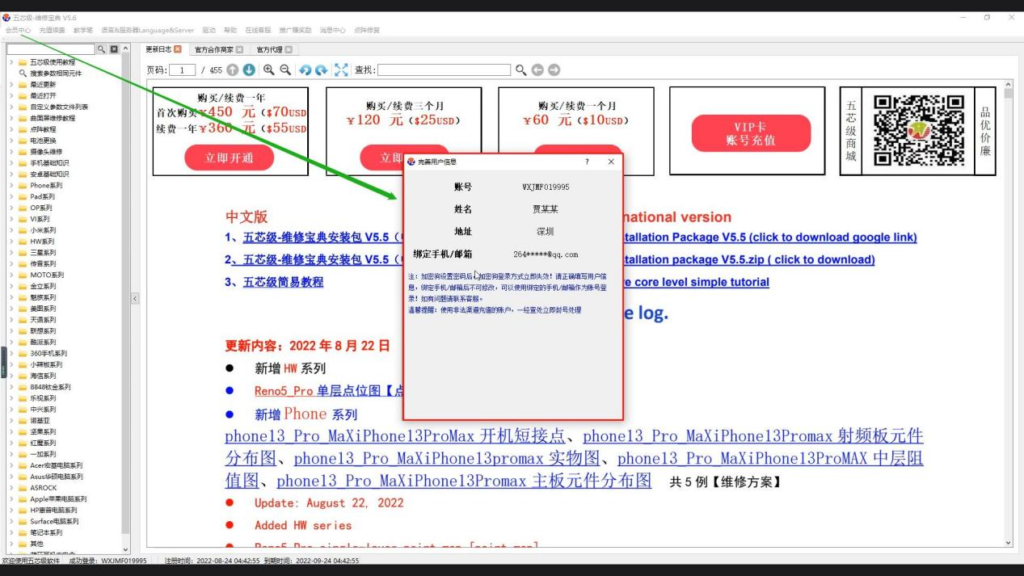 Log in to the Wuxinji software again, enter the Wuxinji repair manual interface, and select user information to fill in in the member center
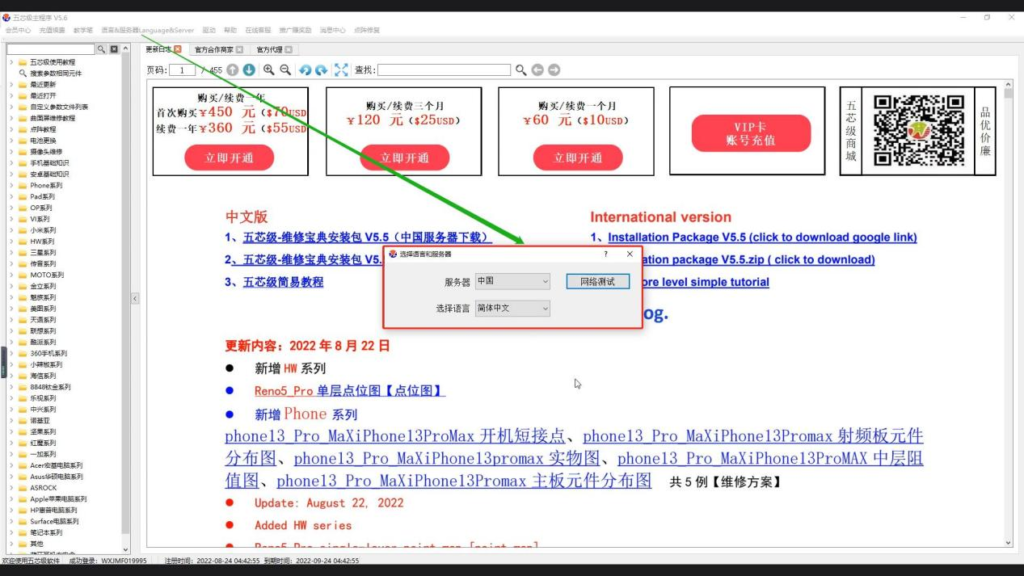 Can also find the server and language options in the window and select them
+
Password modification
- Double click the Wuxinji shortcut key to enter the login interface and find the password to be modified

- Enter the reset password page and fill in the information according to the page prompts
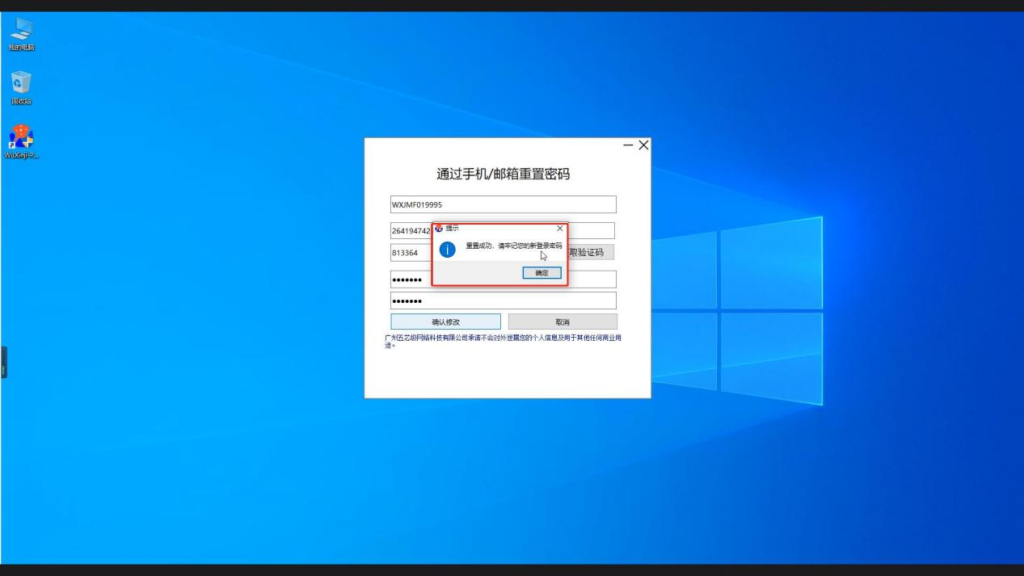
- After filling, click Confirm to modify, and the page will prompt that the reset is successful. Click Confirm to log i

- After password modification, log in again, enter the account and new password, and log in
+
Activation of VIP card
- Double click the Wuxinji shortcut key to enter the login interface and find the “Use VIP Card” option
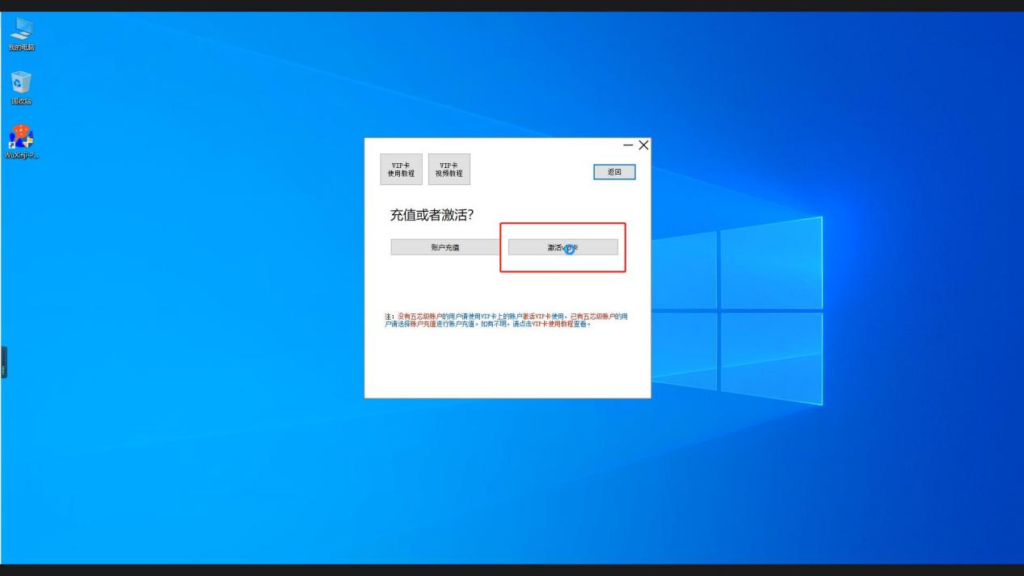
- Click “Use VIP card” to enter this interface and click to activate the VIP card
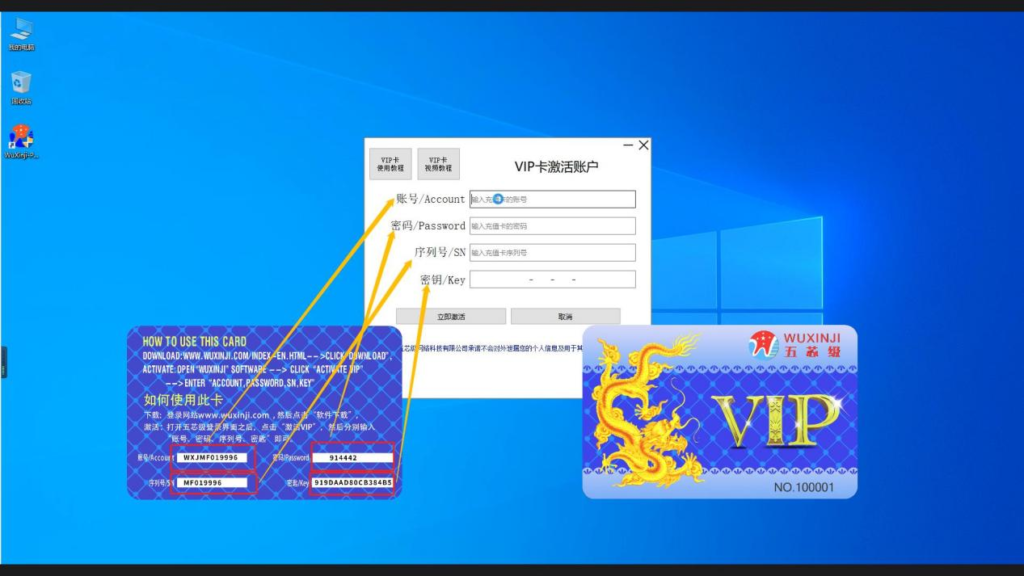
- After entering the activation page, fill in the information according to the page prompts. After filling in, Click Activate No

- We return to the login interface to log in
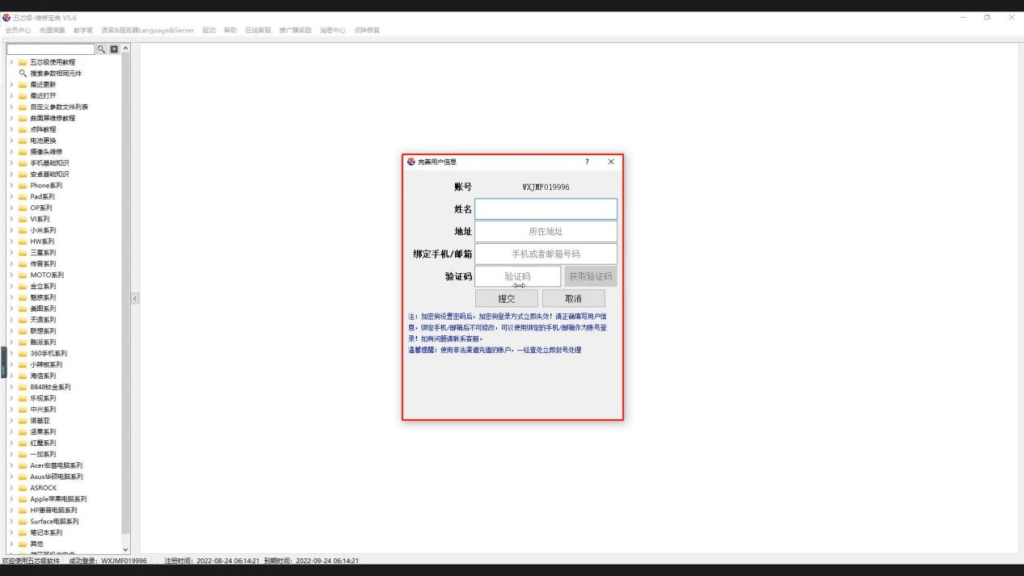
- After entering the Wuxinji level maintenance dictionary interface, the system will prompt the user to improve personal information, and the user can complete according to the page prompts
+
Installation and Use of Video Driver Controls
- Double click the Wuxinji shortcut key to enter the login interface, and click Login

- Enter the Wuxinji level maintenance dictionary interface, select a video randomly in the lattice tutorial, and you will see the system prompts whether to download the video control, which can be installed directly, or you can find the drive option in the window to install
- Find the driver option in the window, which contains three options. The PDF control does not need to be installed, we just need to click the video driver
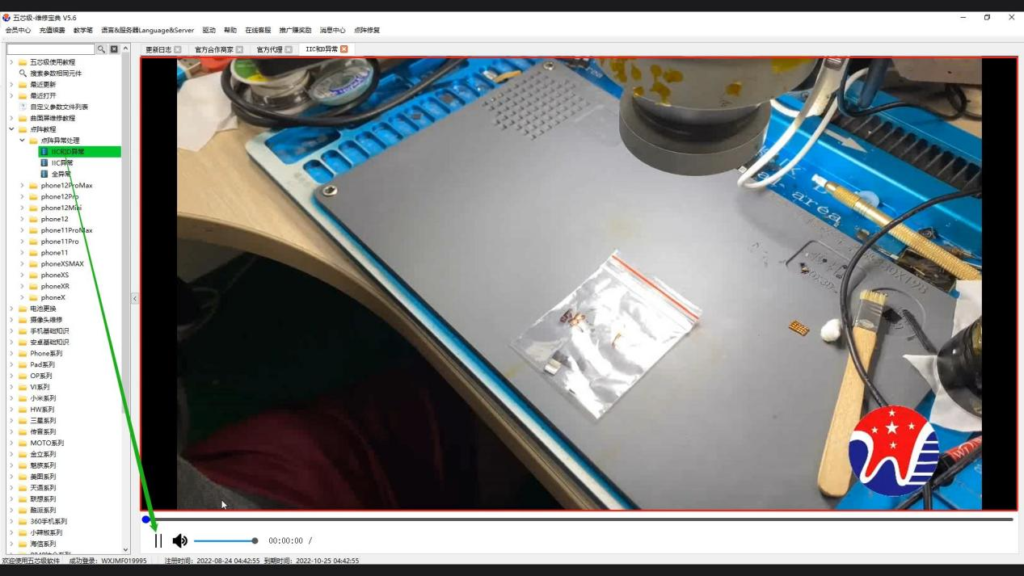
- After installation, click the video again, and the video can be played normally
Software recharge
+
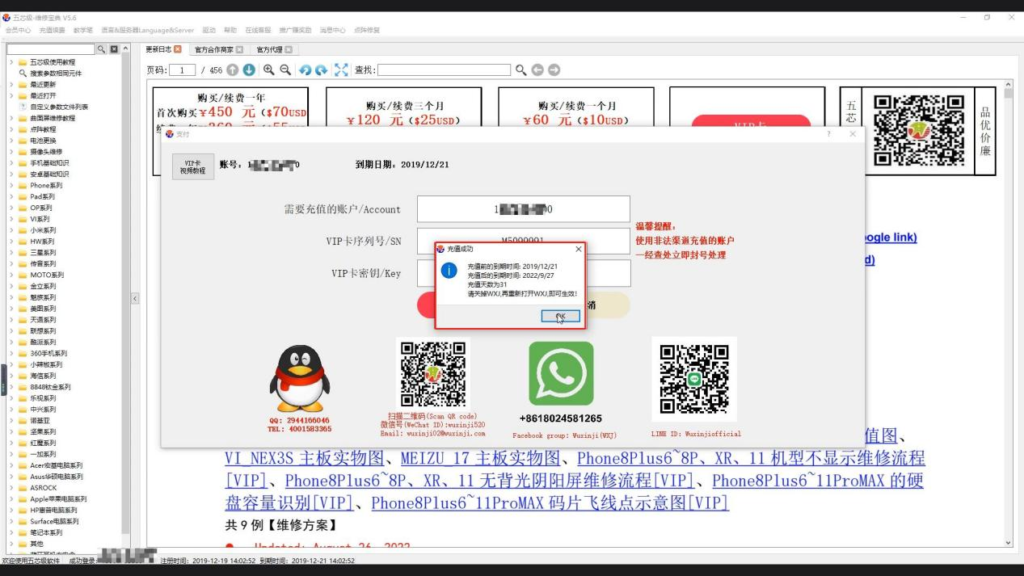
Valid users use VIP cards to recharge and renew themselves
- Double click the Wuxinji shortcut key to enter the login interface, and click Login

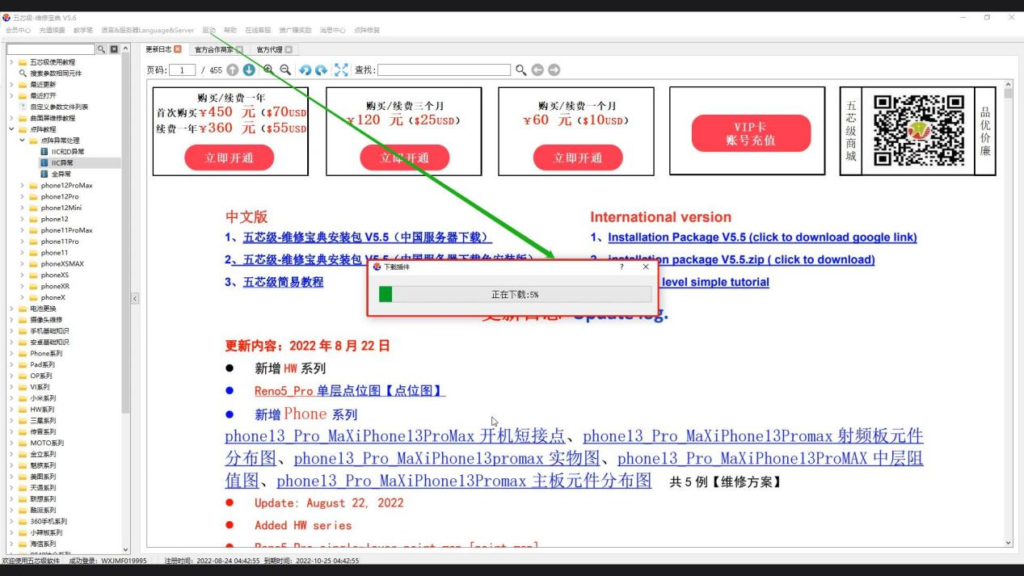
- Enter the Wuxinji repair manual
interface, find the recharge and renewal in the window, and click OK
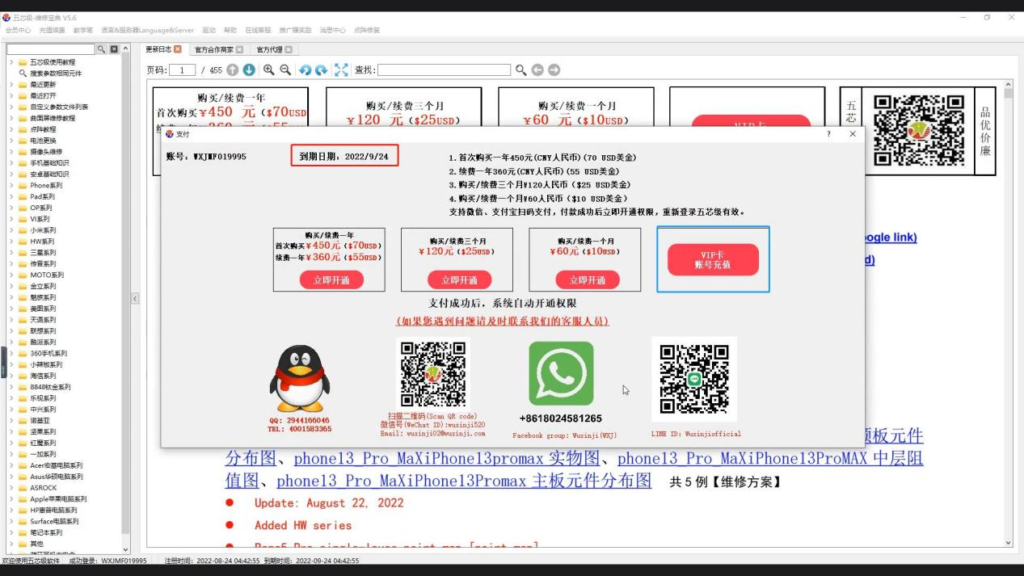
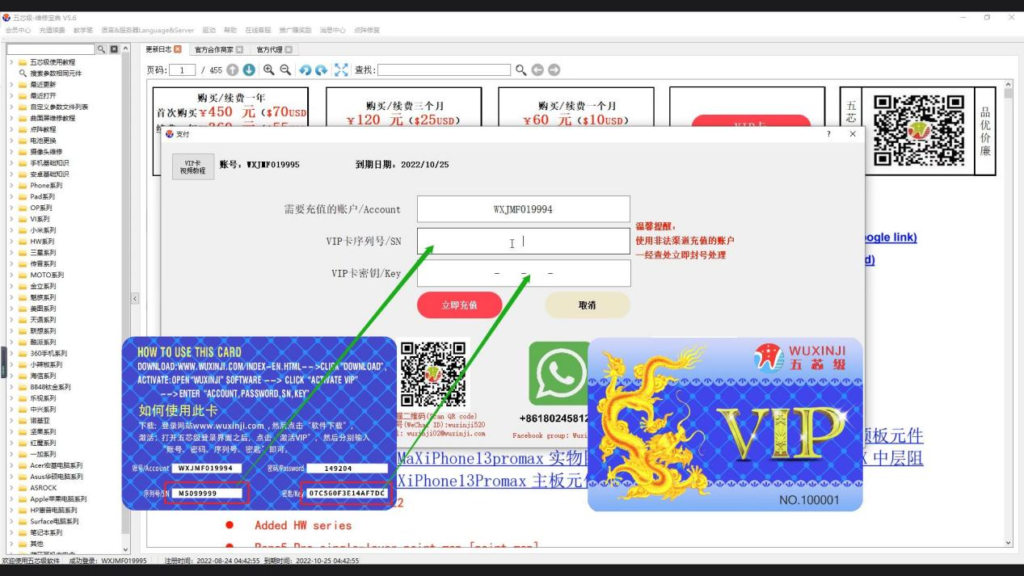
- When you enter the payment interface, you
can see that the account is within the validity period. We select a VIP card account to recharge
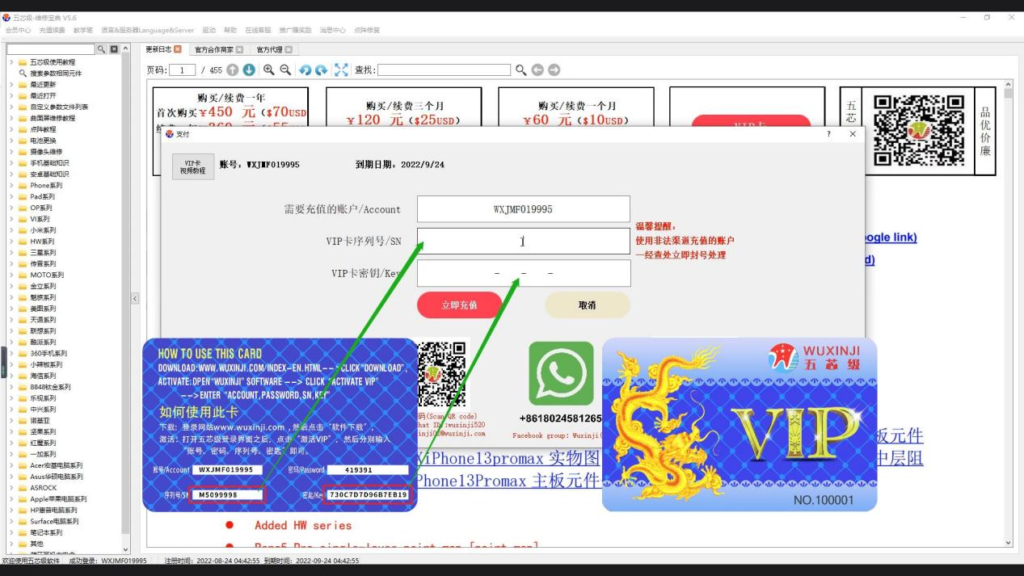
- Enter the serial number and key on the
back of the VIP card. After entering, click Add Now
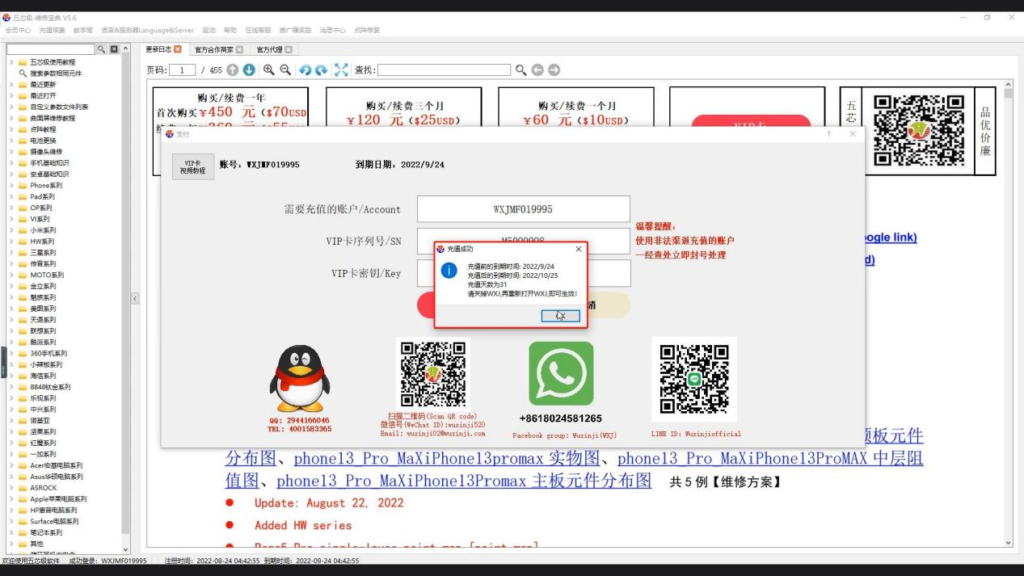
- The system prompts that the recharge is
successful, and click OK

- Re enter the interface to see that the
expiration date has been extended
+
Expired users use VIP cards to recharge and renew themselves
- Double click the Wuxinji shortcut key to
enter the login interface, and click Login
- Enter the Wuxinji maintenance dictionary
interface, find the recharge and renewal in the window, and click OK

- Enter the payment interface, you can see
that the account has expired, and we select the VIP card account to recharge

- Enter the serial number and key on the
back of the VIP card. After entering, click “Recharge Now”
- The system prompts that the recharge is
successful. Click OK

- Re enter the interface to see that the
expiration date has been extended
+
Agents use VIP cards to recharge and renew customers
- Double click the Wuxinji shortcut key to
enter the login interface, and click Login
Enter the Wuxinji repair manual
interface, find the recharge and renewal in the window, and click O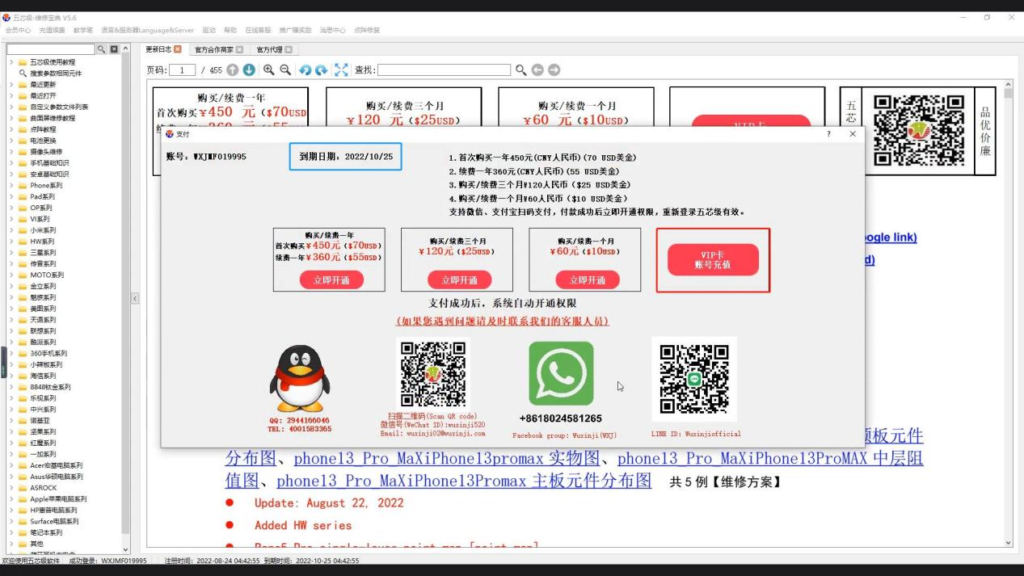
- Enter the payment interface to view the
account expiration date. We can select a VIP card account to recharge
- Enter the customer’s account number,
serial number and key on the back of the VIP card. After entering, click Add Value Now

- The system prompts that the recharge was
successful. Click OK to see that the expiration date has been extended
Software functions
+
How to use the teaching pen
- Double click the Wuxinji shortcut key to
enter the login interface, and click Login
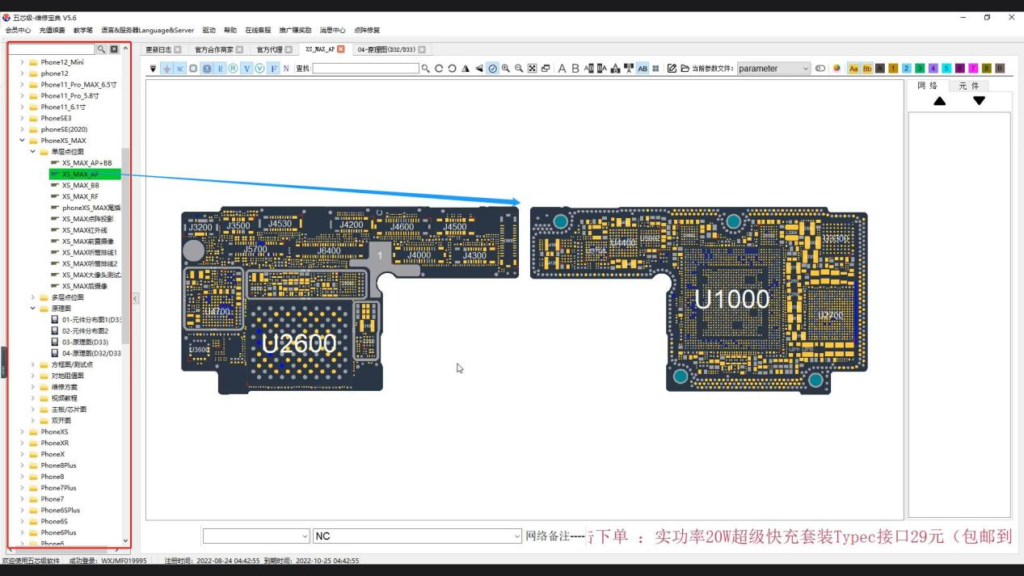
- Find the iPhone series options in the
left list. Take the iPhone XS MAX as an example. Click in to find a single-layer bitmap, select the XS MAX AP, and click
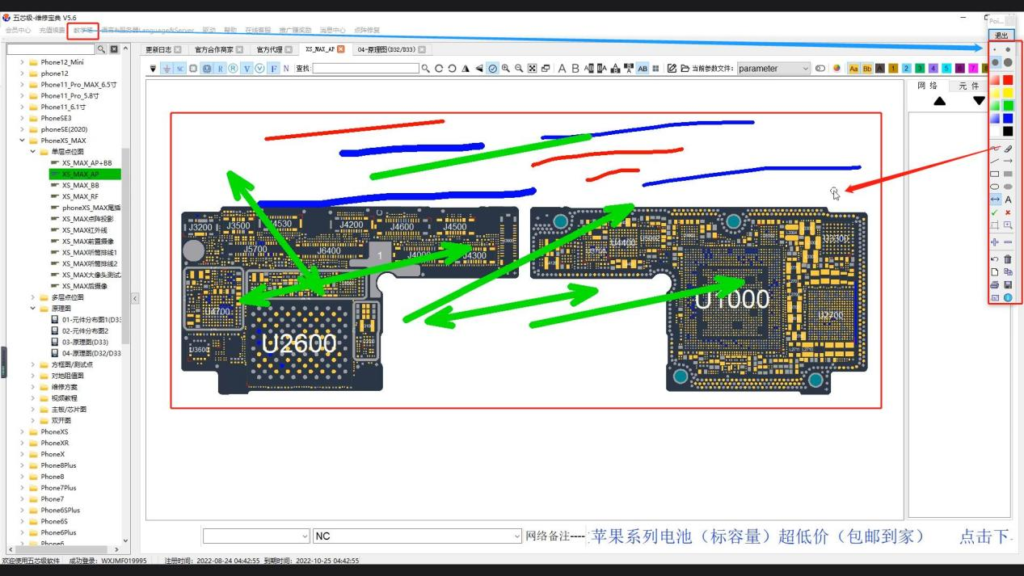
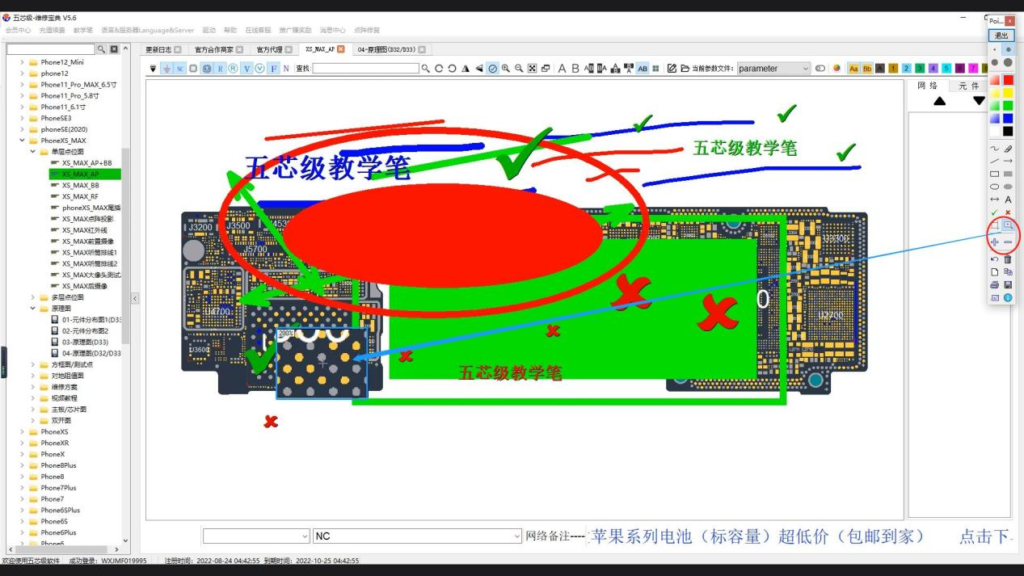
- Find the teaching pen option at the top, click the teaching pen, and two options will appear at the bottom. The Point option displays the Chinese version, and the Screen option displays the foreign version. When you use it, you can choose according to your own needs. Here, you can choose the Point option. The four dots on the top are used to adjust the size of the brush, and the color area on the bottom is used to adjust the color of the brush. Select the brush tool to operate directly on the screen. If you
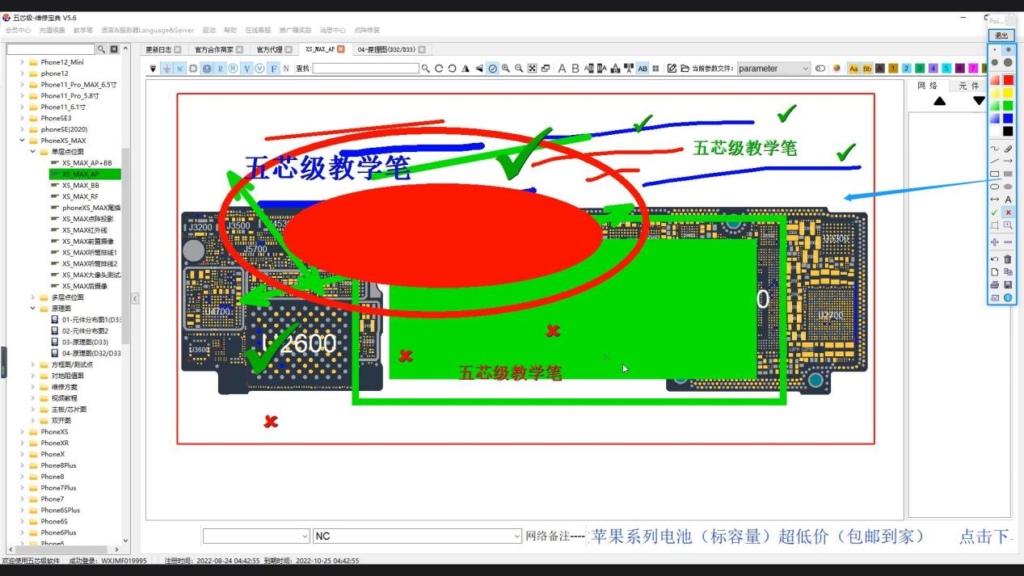
- Select a rectangle box to draw a hollow rectangle. Select a solid rectangle on the right to draw a solid rectangle. You can also change the thickness and color of the border according to your own needs. If you want to input text, click option A to edit the text. The dot on the top adjusts the font-size. In the color area, you can select fonts of different colors. At the same time, you can also click “√” or “X” to make teaching judgment
- If you need to zoom in or out as a whole, click the “+” or “-” sign directly to make an overall adjustment. If you need to enlarge a local page, just click the magnifying glass and click the dot above to adjust the size of the magnifying glass
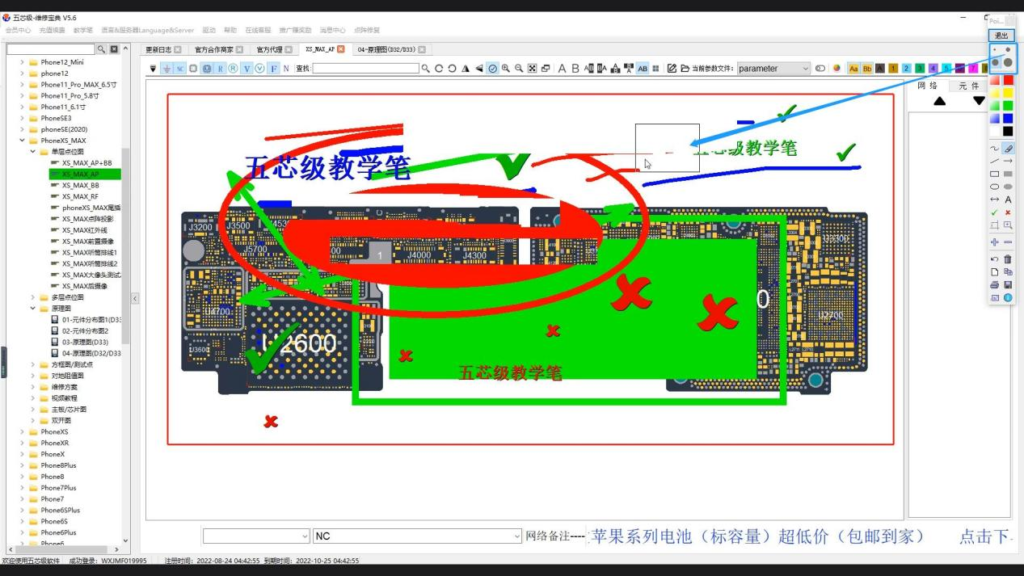
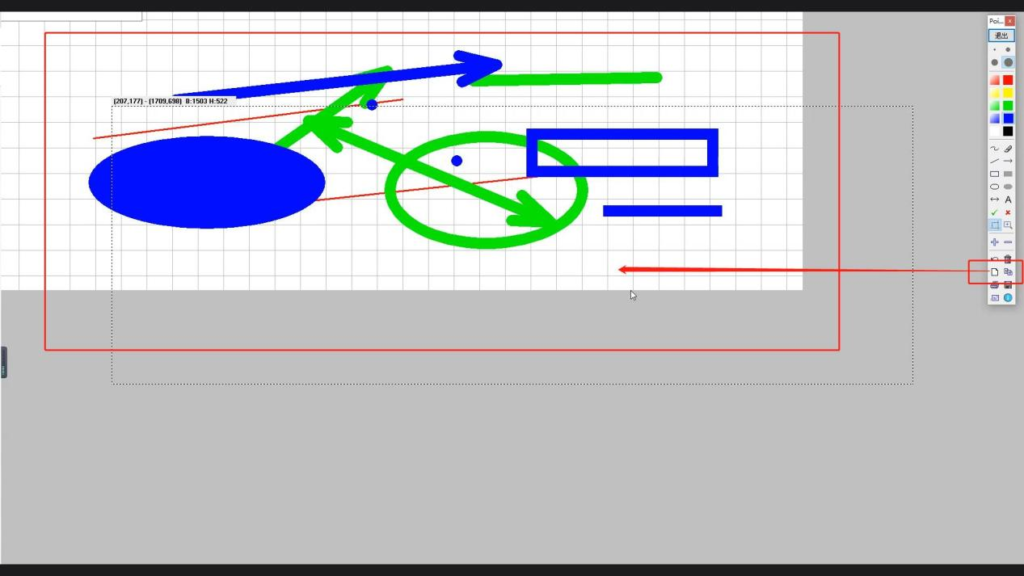
- You can also choose to create a new canvas, create a new page, and perform various operations
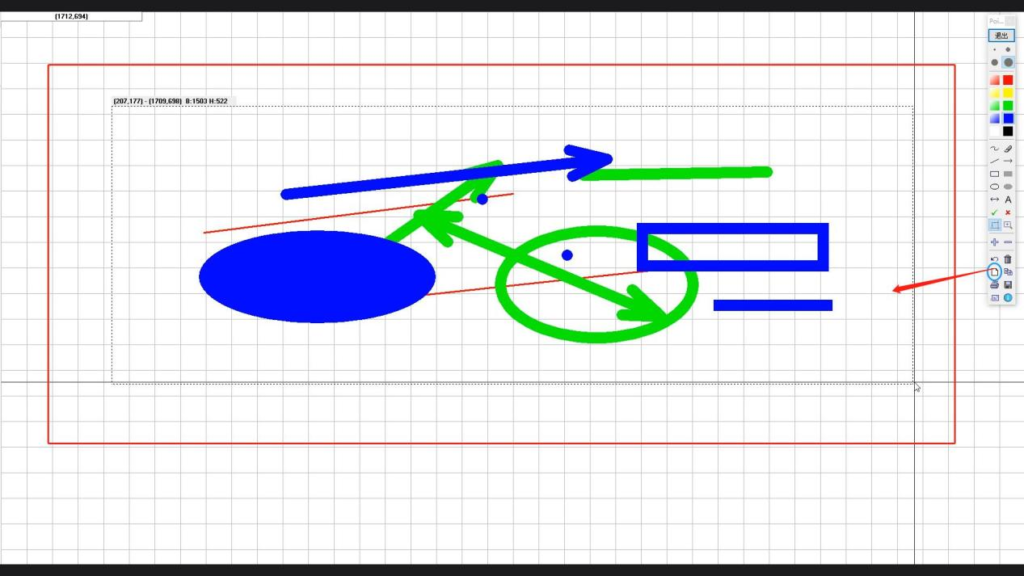
- You can also copy the mark. Use the Select Region tool to select the region to copy. Click Copy to the clipboard. In the clipboard, we can zoom in or out by scrolling the middle mouse button to view the copied content
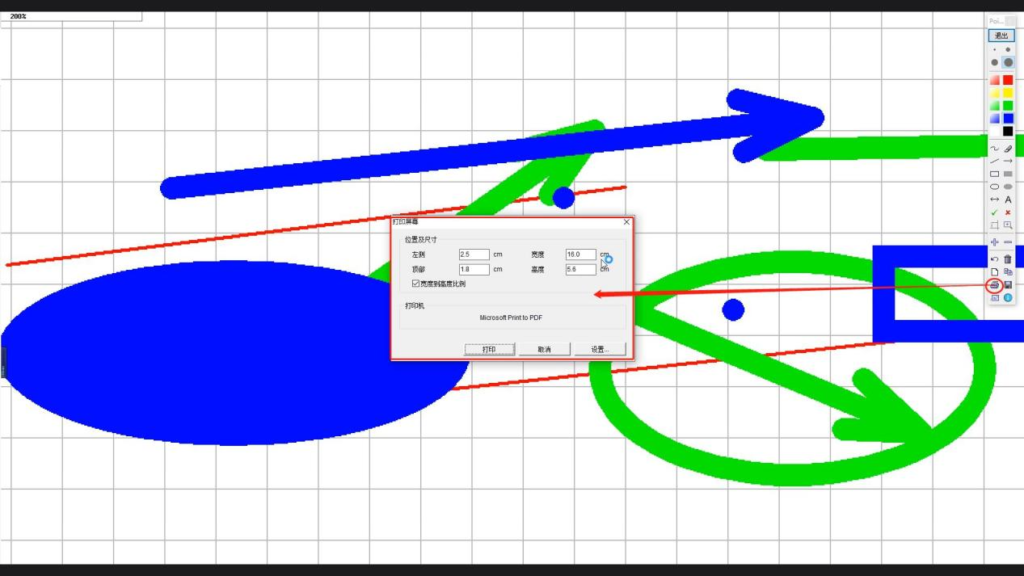
- If you need to print, click the print tool directly and set the corresponding parameters to print.
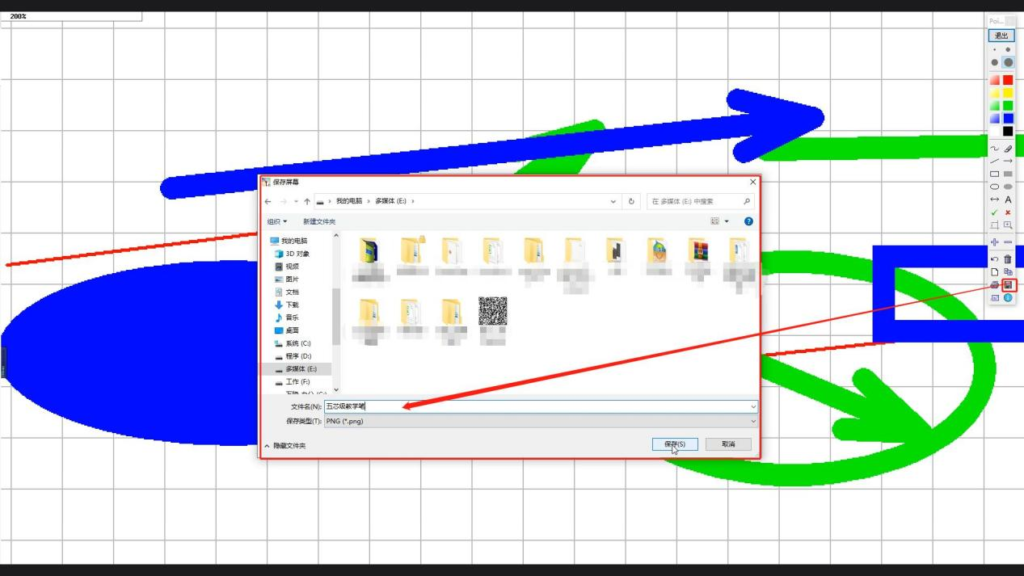
- When clicking the Save option, you should select the location you want to save, name it, and click OK to save.
- You can also select the email sending option to select different formats as required.
+
Position Customization
- Double click the Wuxinji shortcut key to enter the login interface, and click Login
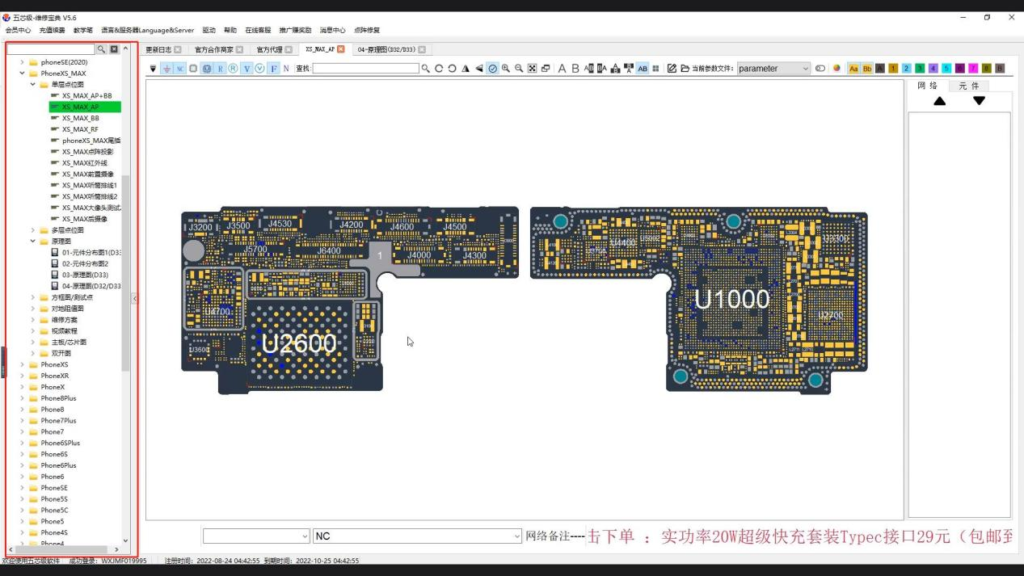
- Find the iPhone series options in the left list. Take the iPhone XS MAX as an example. Click in to find a single-layer bitmap, select the XS MAX AP, and click
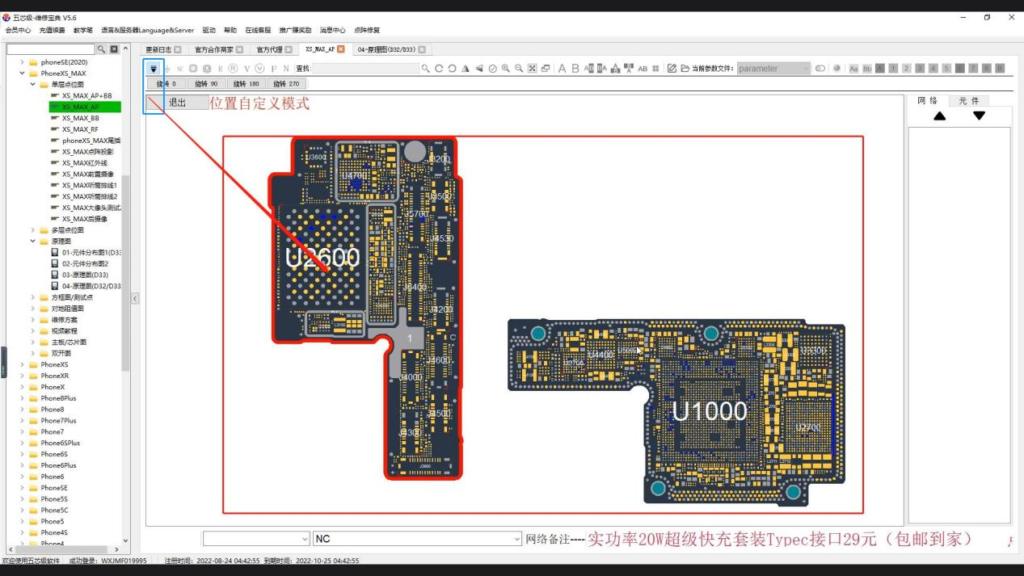
- Find the position customization option on the menu bar, click the position customization option, and we can either select a point bitmap to move or rotate it, and select the rotation degree
according to our actual needs
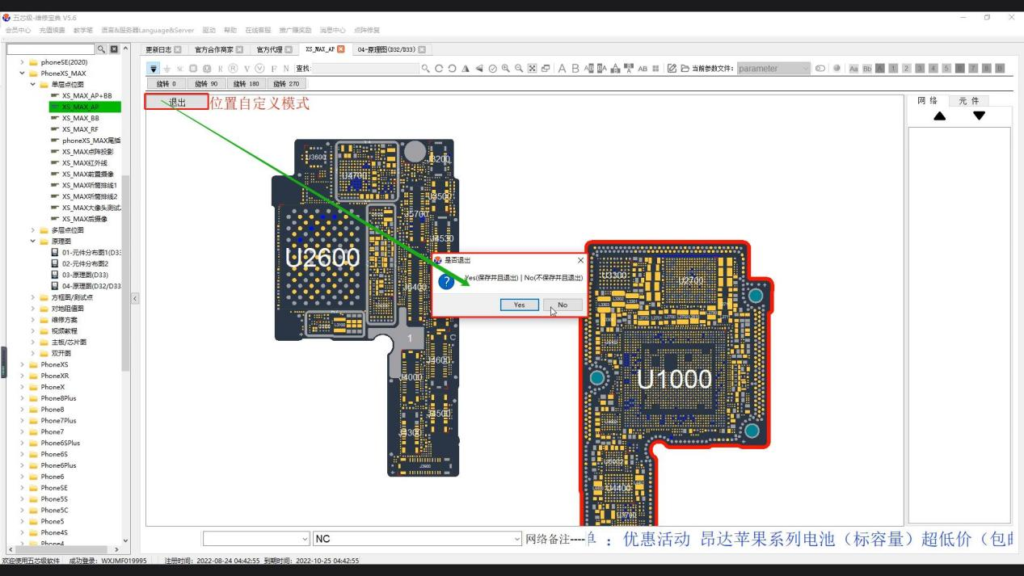
- Click the Exit option, and the page will pop up whether to select Save. If Yes is selected, our previous operations will be saved. If No is selected, the previous operation will not be saved
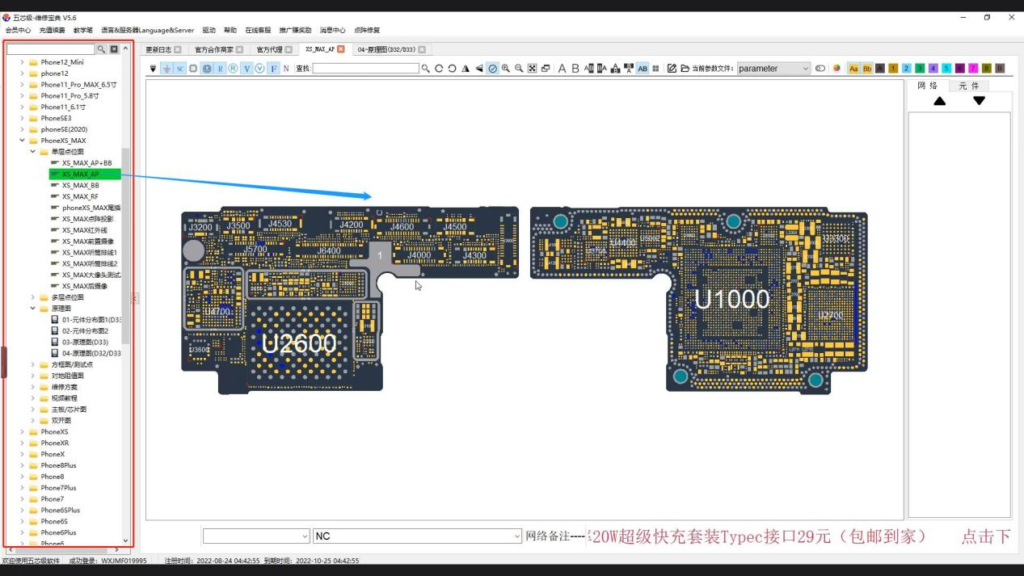
- If you want to restore to the original location, we just need to click the official layout option, and the bitmap will automatically return to the original location
+
View Split Layout
- Double click the Wuxinji shortcut key to enter the login interface, and click Login
- Find the iPhone series options in the left list. Take the iPhone XS MAX as an example. Click in to find a single-layer bitmap, select the XS MAX AP, and click
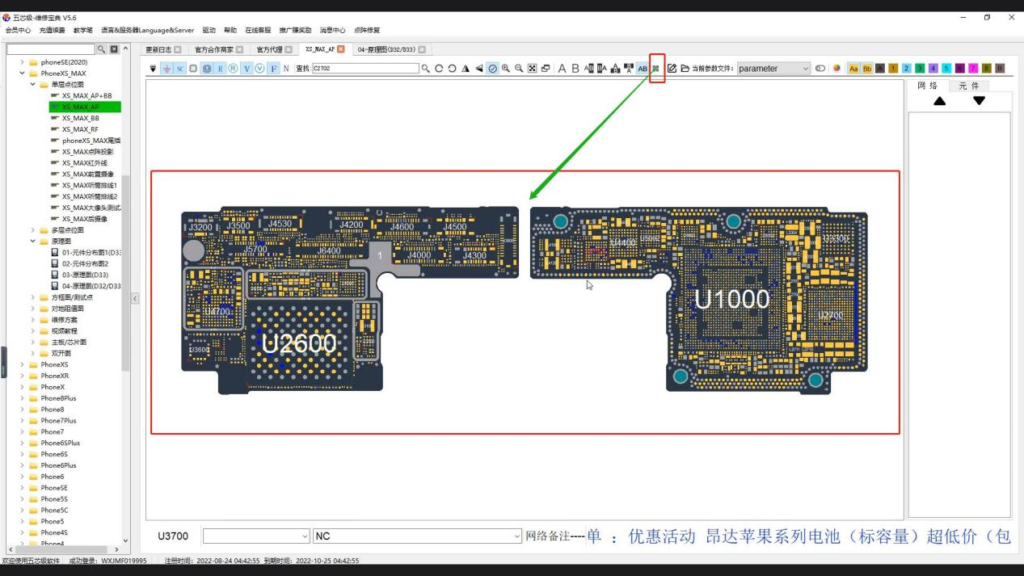
- Find the Split Layout option on the menu bar. Select A, and the view layout will only display the point bitmap on the right
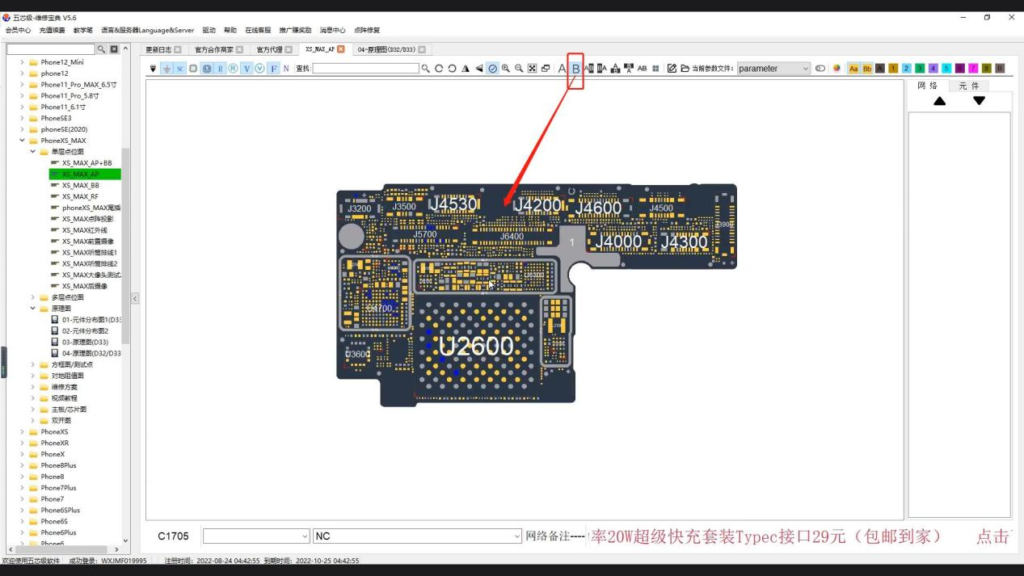
- If B is selected, the view layout only displays the left bitmap
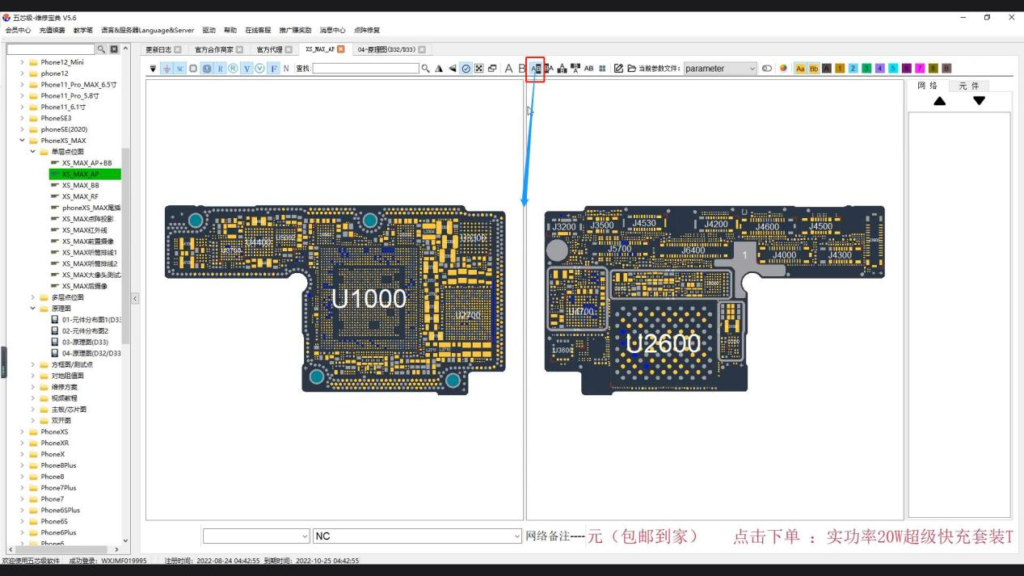
- If left A and right B are selected, a vertical line will appear in the middle of the view layout. You can operate and zoom in on the left and right bitmap separately. Neither side will be affected.
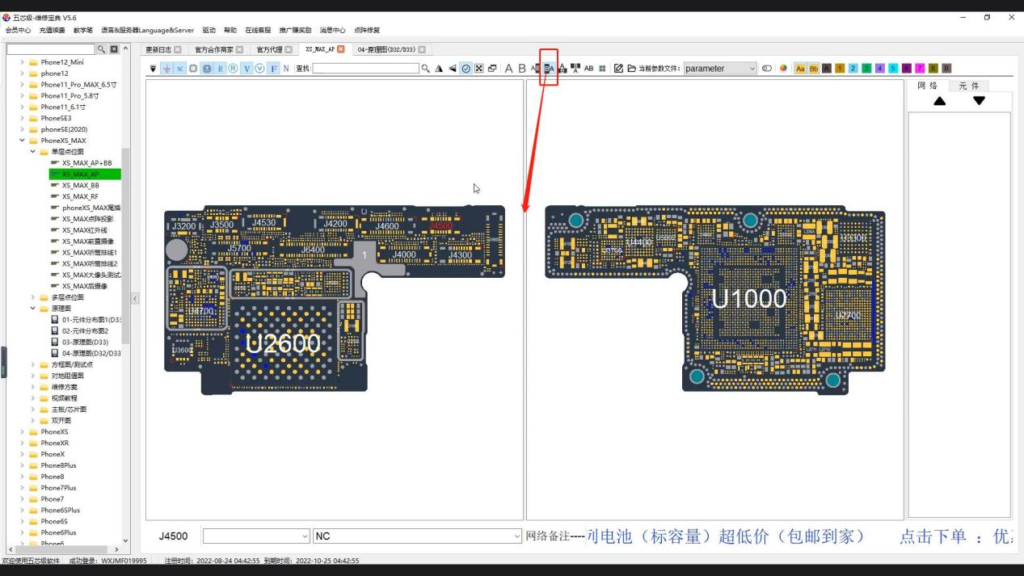
- If left B and right A are selected, a vertical line will also appear in the view layout. At the same time, the point bitmaps on the left and right sides will be exchanged. The point bitmaps on the left and right sides will be operated and zoomed in separately, and neither side will be affected.
- Select A above B below, and a horizontal line will appear in the view layout. The A point bitmap is on the top, and the B point bitmap is on the bottom. The point bitmaps on the upper and lower sides are operated and magnified separately, and neither side will be affected.
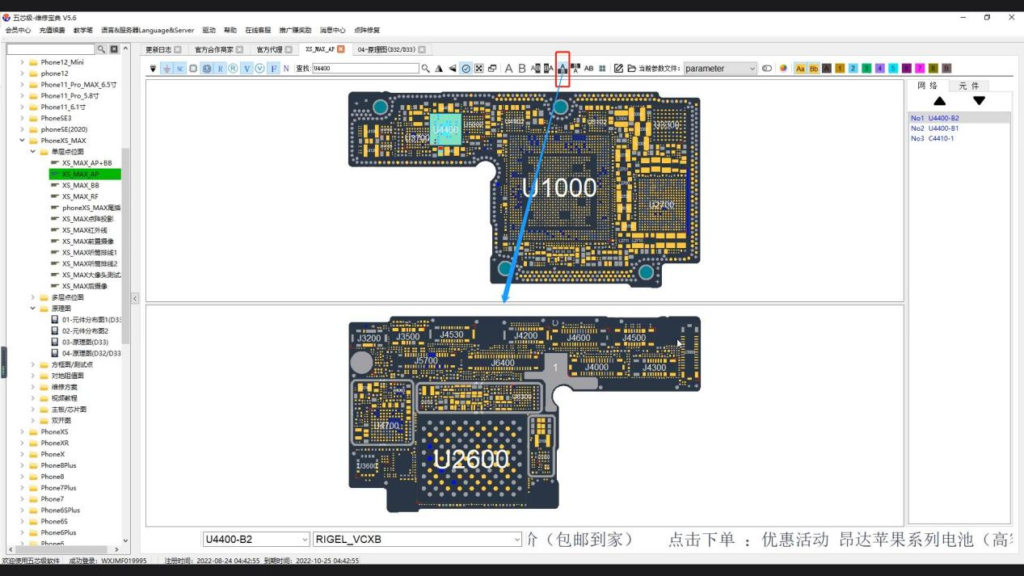
- Select A above B below, and a horizontal line will appear in the view layout. The A point bitmap is on the top, and the B point bitmap is on the bottom. The point bitmaps on the upper and lower sides are operated and magnified separately, and neither side will be affected.
- Select B above A below, and a horizontal line will also appear in the view layout. The B point bitmap is on the top, and the A point bitmap is on the bottom. The point bitmaps on the upper and lower sides are operated and magnified separately, and neither side will be affected
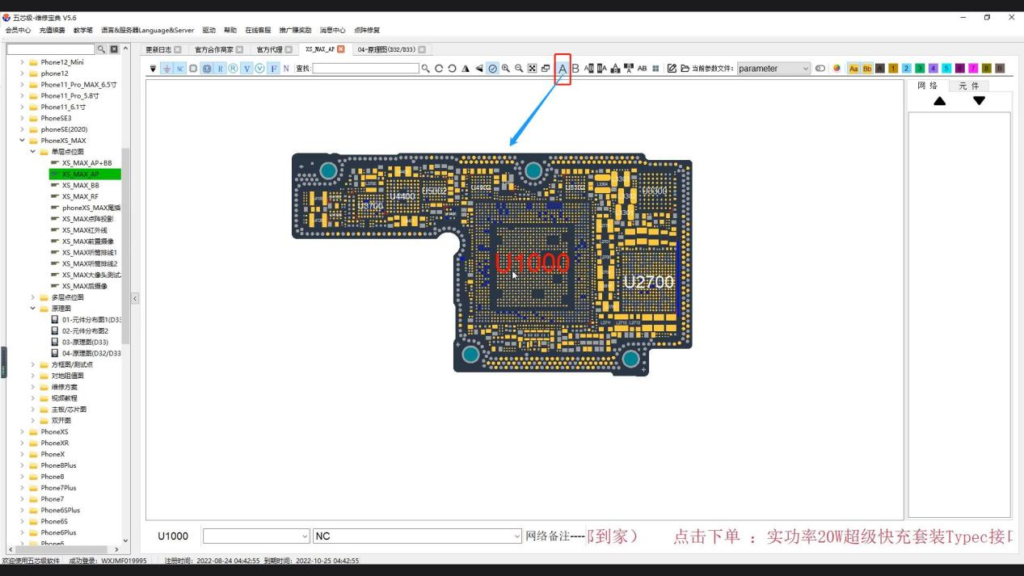
- Select the AB merge option, and the bitmaps on both sides will be merged together
- Click the official layout option, and the bitmap will automatically return to its original position
+
User defined parameters
- Double click the Wuxinji shortcut key to enter the login interface, and click Login

- Find the iPhone series options in the left list. Take the iPhone XS MAX as an example. Click in to find a single-layer bitmap, select the XS MAX AP, and click
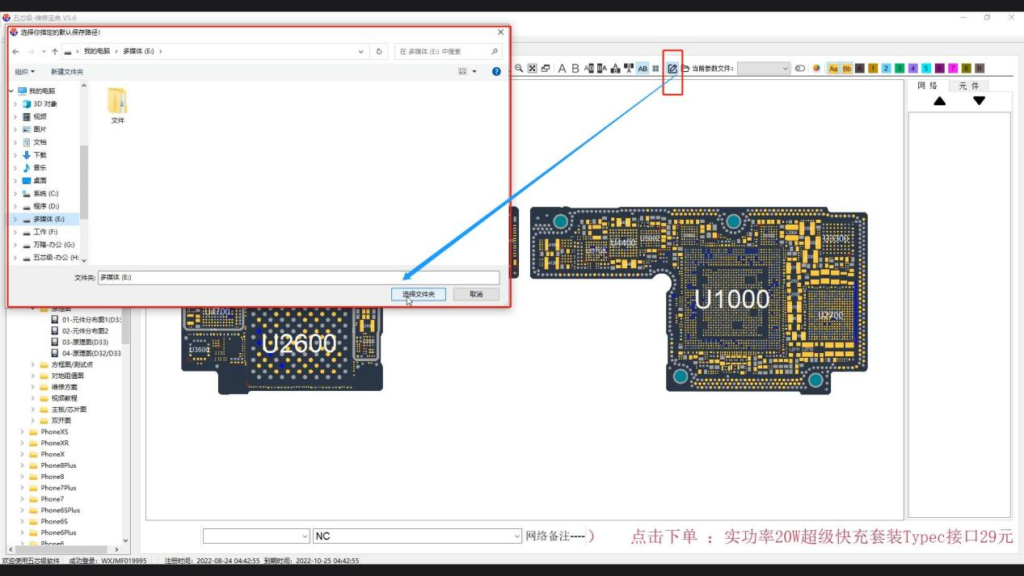
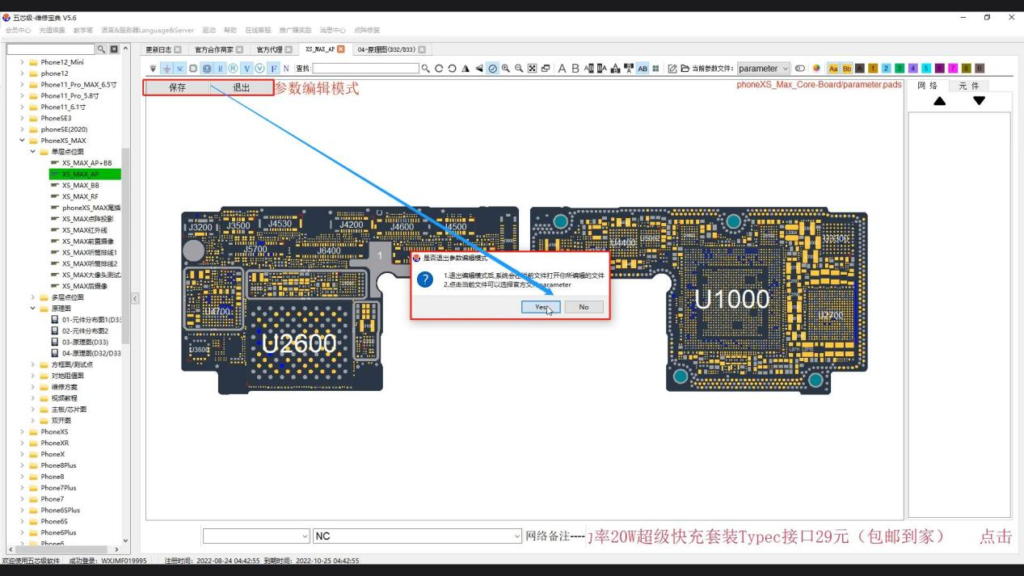
- In the menu bar, find the parameter editing option. During the first operation, the system will pop up the parameter editing process and select OK. The system will let us select the specified
folder to save, select the location to save, and click to select the folder
- After the file is saved, you can see the save and exit options in the upper left corner, and make choices according to your actual needs
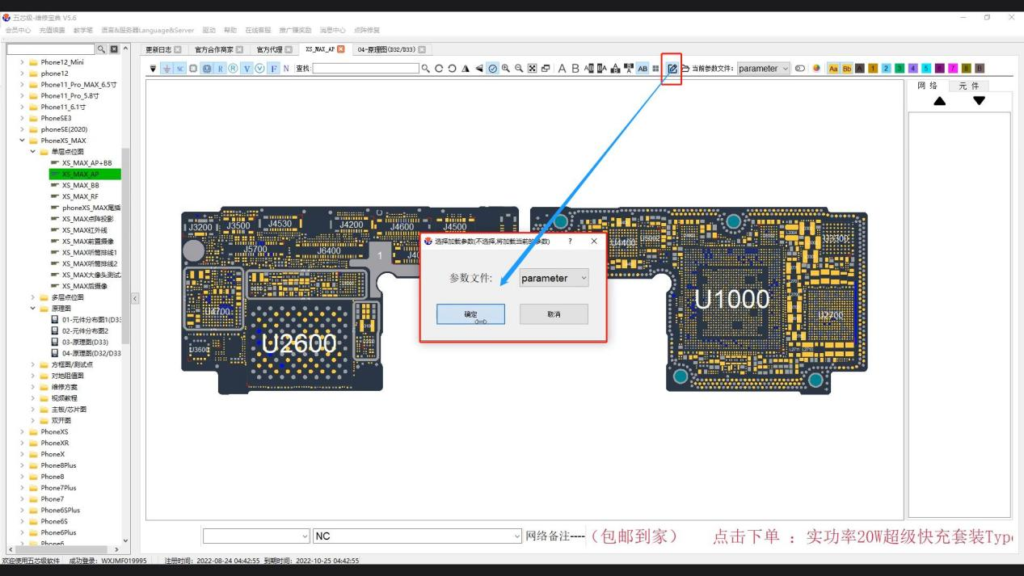
- During the second operation, click the parameter editor, and the “Select Loading Parameter” option will pop up. Select OK to edit
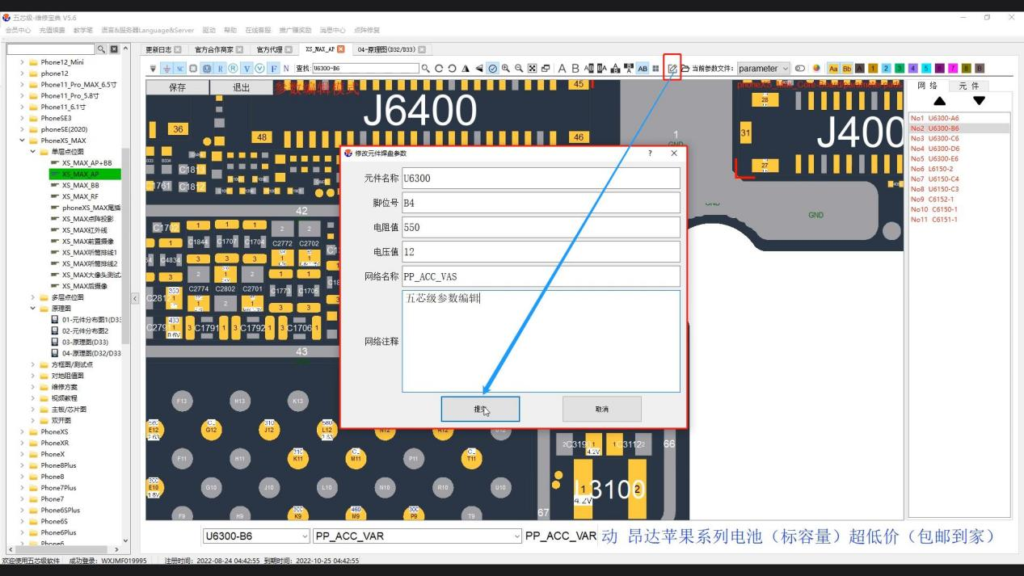
- Select one pad and double-click to enter the editing window. On the Modify Component Pad Parameters page, you can modify the component name, pin number, resistance value, voltage value, network name, and make network comments. After modification, click Submit
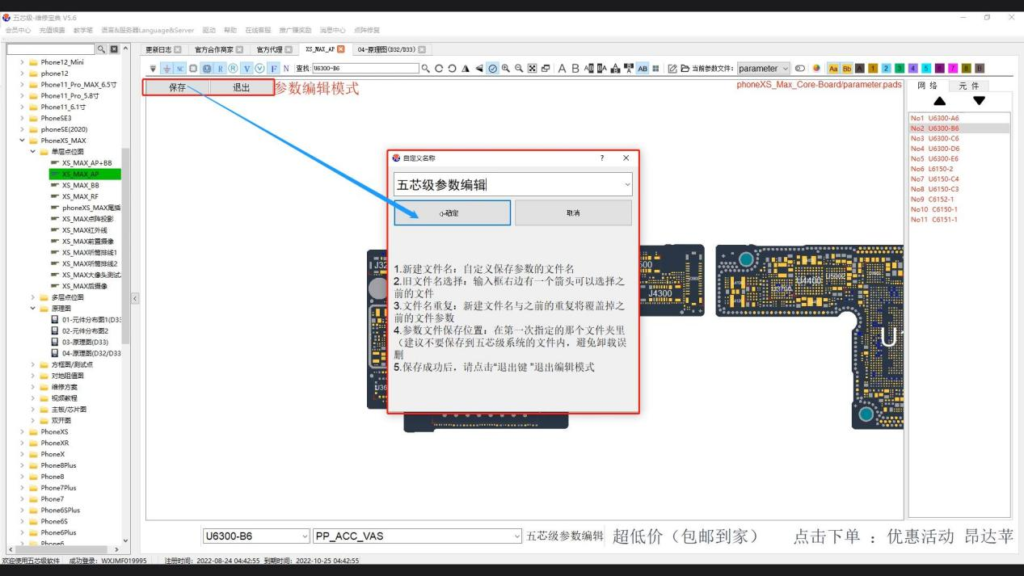
- In the upper left corner of the operation interface, you can see the save and exit options. Click Save, and the user-defined name option will pop up. Enter the name you want, and click OK. The system will prompt that the save is successful, and click OK
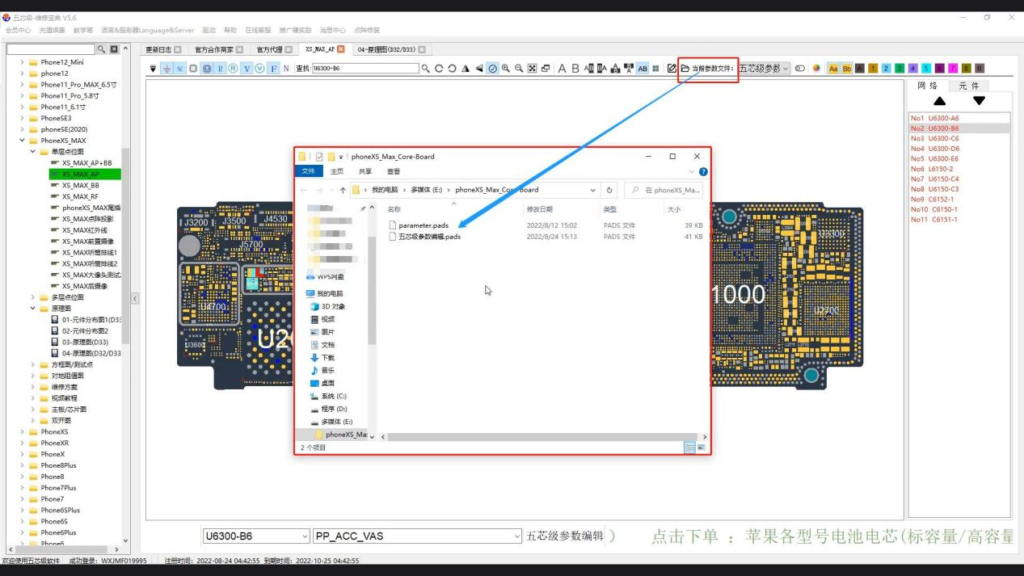
- Select the folder where the parameter is located, and click it to pop up the location where the parameter file is saved. When specifying the location of the file to be saved, we do not recommend putting it in the Wuxinji directory to avoid deleting parameter files by mistake when uninstalling the Wuxinji software
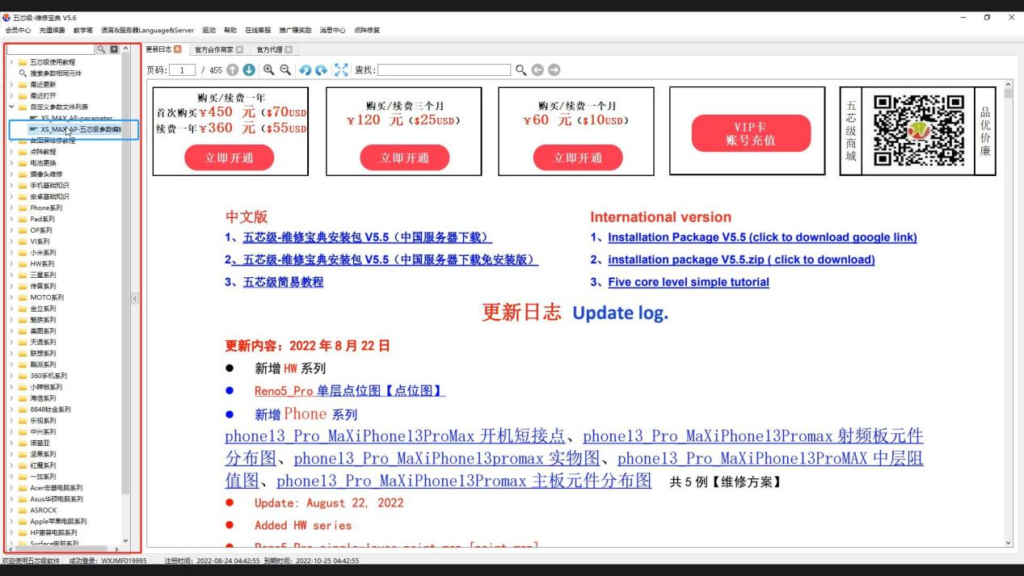
- Exit the Wuxinji level and log in again. The saved parameter file can be seen in the “Custom Parameter File List” on the left.
+
Customized color settings
- Double click the Wuxinji shortcut key to enter the login interface, and click Login
- Find the iPhone series options in the left list. Take the iPhone XS MAX as an example. Click in to find a single-layer bitmap, select the XS MAX AP, and click

- On the menu bar, you can find the color customization. Here, we officially provide 7 color schemes to choose according to your preferences
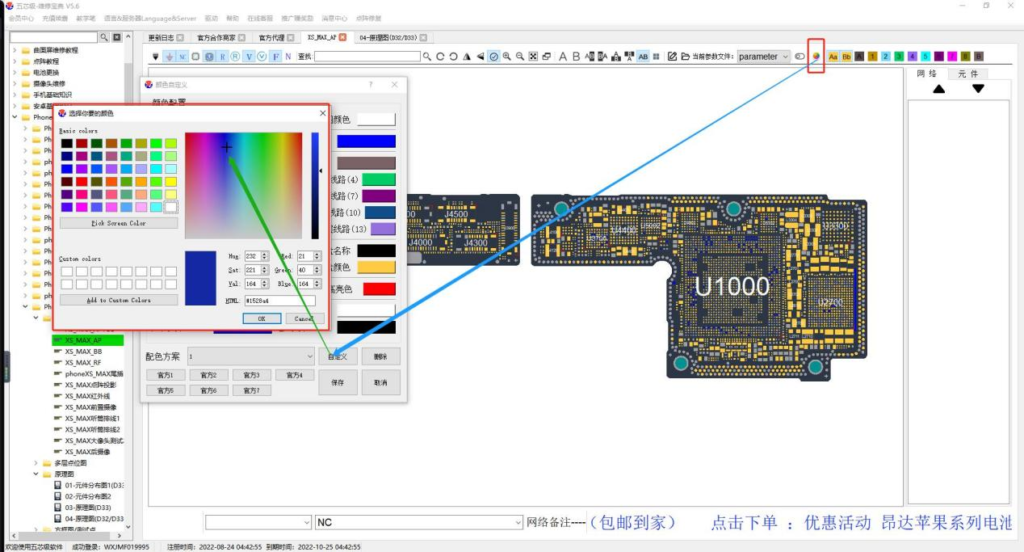
- You can also customize the color. Enter a custom name and click OK to modify the color of each area
+
Multi color mode of pad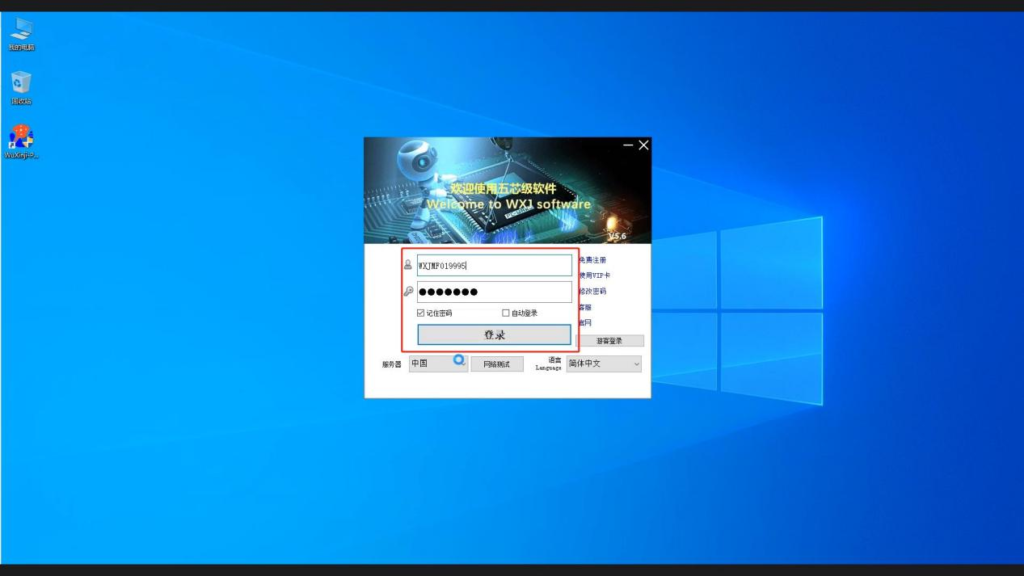
- Double click the Wuxinji shortcut key to enter the login interface, and click Login
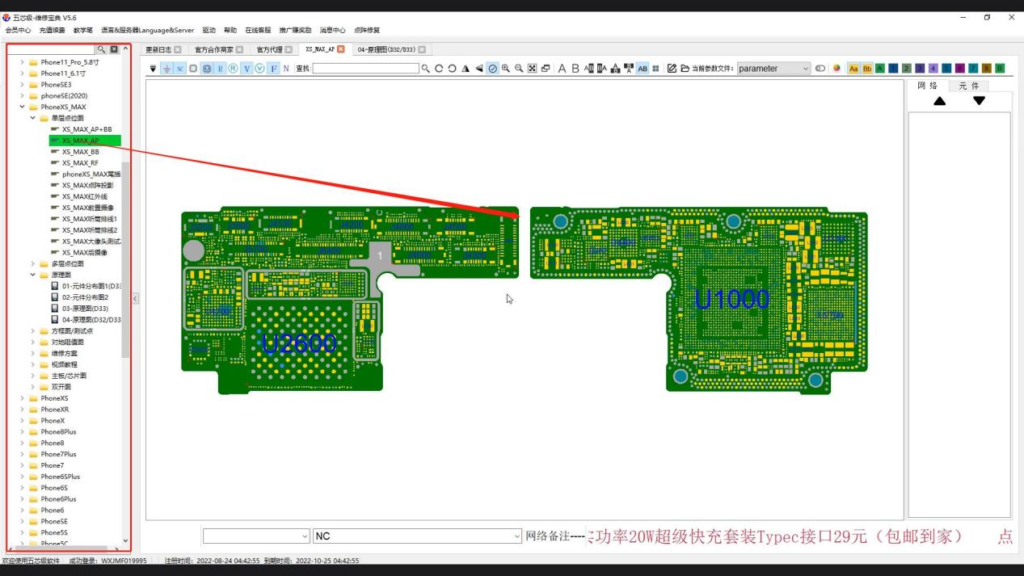
- Find the iPhone series options in the left list. Take the iPhone XS MAX as an example. Click in to find a single-layer bitmap, select the XS MAX AP, and click

- Enlarge the point bitmap to an appropriate position, click one of the pads, and find the pad multi-color mode in the upper menu bar. After clicking, another option will appear, and we click to set multi-color pads.
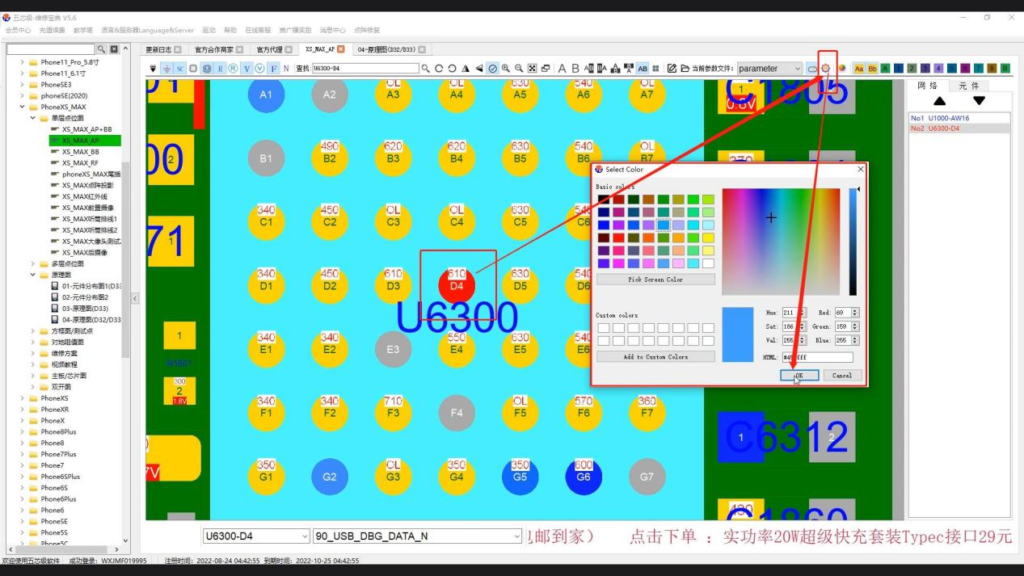
- Choose the color you like according to your preference
- Click OK, and the pad color will change
+
Single layer and multi-layer dot map network cableimage
- Double click the Wuxinji shortcut key to enter the login interface, and click Login
image
- Find the iPhone series options in the left list. Take the iPhone XS MAX as an example. Click in to find a single-layer bitmap, select the XS MAX AP, and click
image
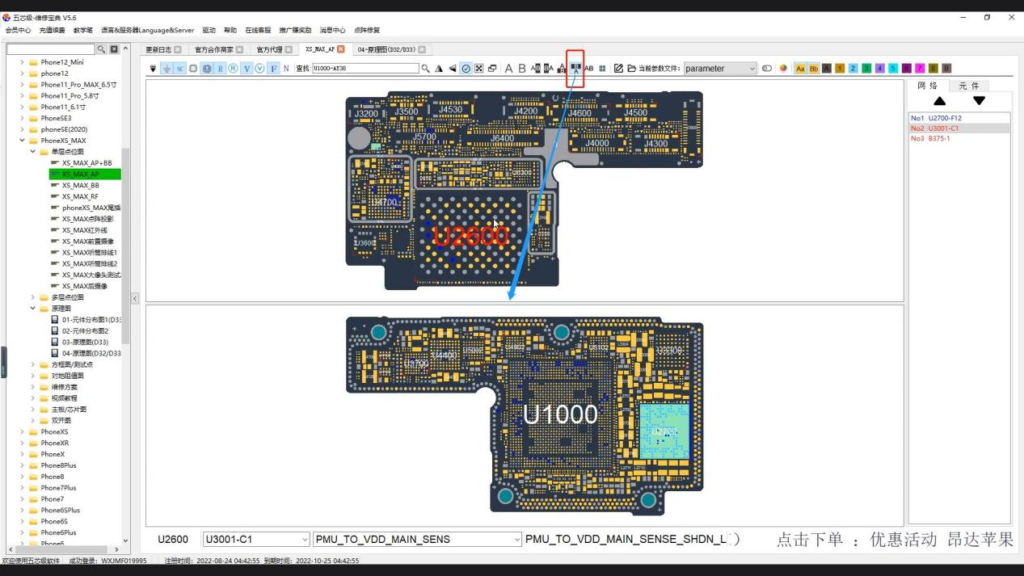
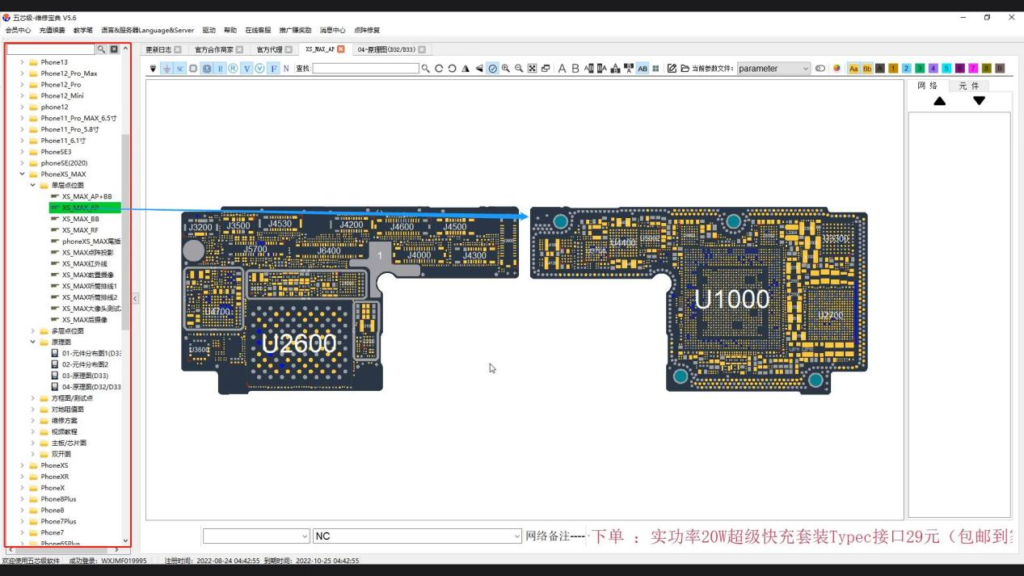
- Find the circuit diagram option on the menu bar, click it in turn, and you will see the network lines of the point bitmap are clearly displayed
image
- Operate for many times. Different serial numbers represent different network lines
image
- On the iPhone XS MAX level, find the multi-layer bitmap and perform the operation
image
- It can be seen that different serial numbers represent different network diagrams
+
Use of right-click menu listimage
- Double click the Wuxinji shortcut key to enter the login interface, and click Login
image
- Find the iPhone series options in the left list. Take the iPhone XS MAX as an example. Click in to find a single-layer bitmap, select the XS MAX AP, and click
image
- In the blank space, click the right mouse button to see many options. These options correspond to the iPhone XS MAX on the left. Click a single layer of bitmap to see the corresponding name. Click to jump to the selected page.
image
- Select the schematic diagram, and you can see the corresponding positions and names on the left and right sides
image
- Select the block diagram/test point, and you can also see the corresponding location and name
image
- Click Add Guide, and the guide will appear. You can add multiple vertical or horizontal guides according to your needs
image
- In the bitmap, select a component, right-click, and two more options will appear – “Export Component Picture” and “Open Folder of Parameters”.
image
- If you need to find the location of the parameter file, just click to open the parameter folder, and the system will automatically jump to the location of the parameter folder
image
- You can see folders at this level for easy searching next time
image
- In actual operation, if you need to export components, you can right-click to find the “Export Component Picture” option and click it.
image
- Select the location where the component image is saved, modify the file name, and click Save
image
- Return to the desktop, find the saved location, and you can view the saved component pictures
+
Elements and Network Navigation Barimage
- Double click the Wuxinji shortcut key to enter the login interface, and click Login
image
- Find the iPhone series options in the left list. Take the iPhone XS MAX as an example. Click in to find a single-layer bitmap, select the XS MAX AP, and click
image
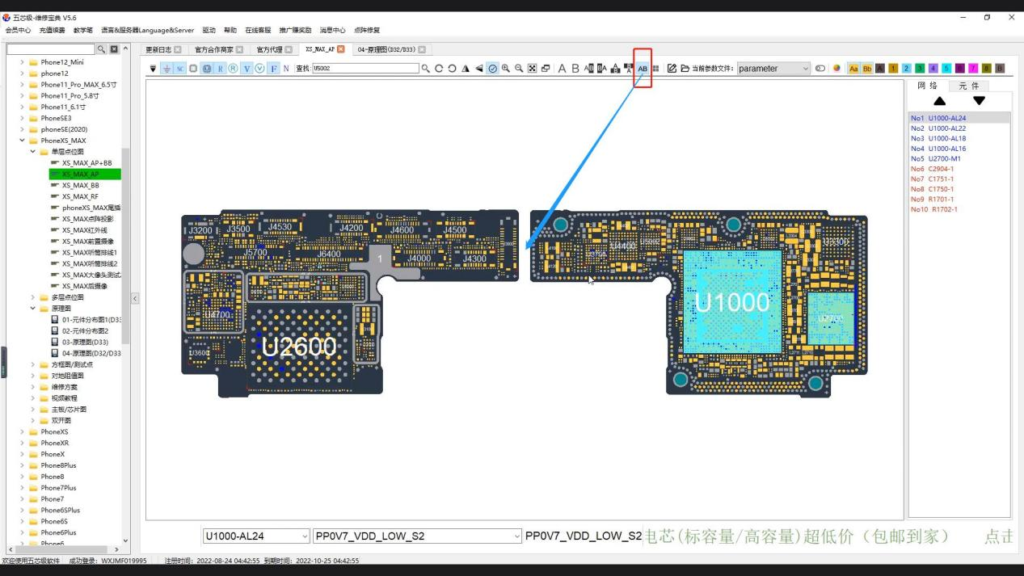
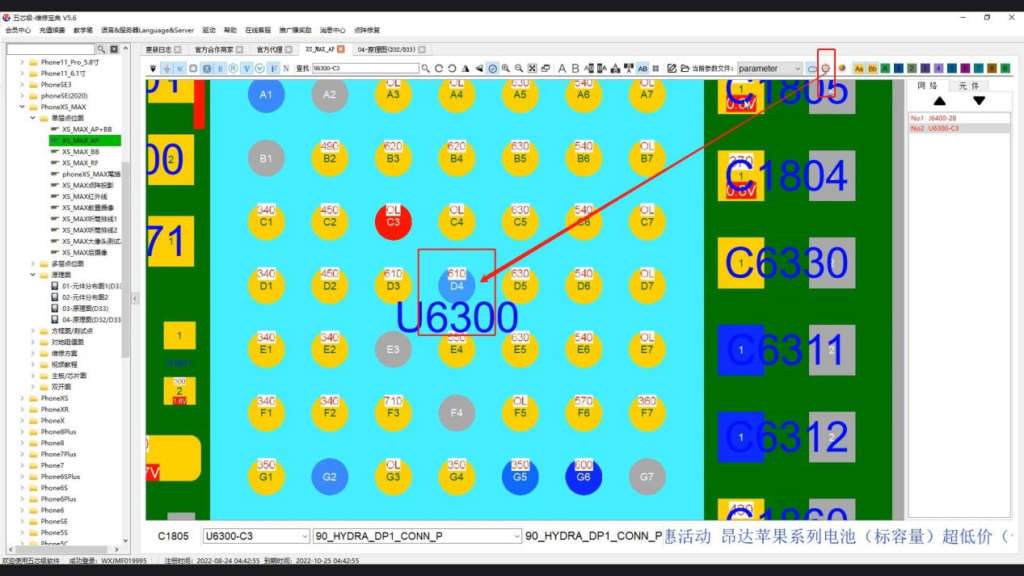
- Enlarge the point bitmap to an appropriate position, click one of the pads, and you can see the network name of the pad at the bottom. In the network option on the right, you can see the name of the pad connected by the network line of the pad.
image
- Click the “Display Network Guidance” option, and the network cable connected to the pad will be displayed
image
- In the right navigation bar, click the name of any pad, and the system will automatically locate the location of the pad, and display the content of the pad in the prompt box
image
- Zoom in on the selected pad, you can clearly see the network lines in the middle of the pad. Double click the blank space, and the prompt box will disappear.
image
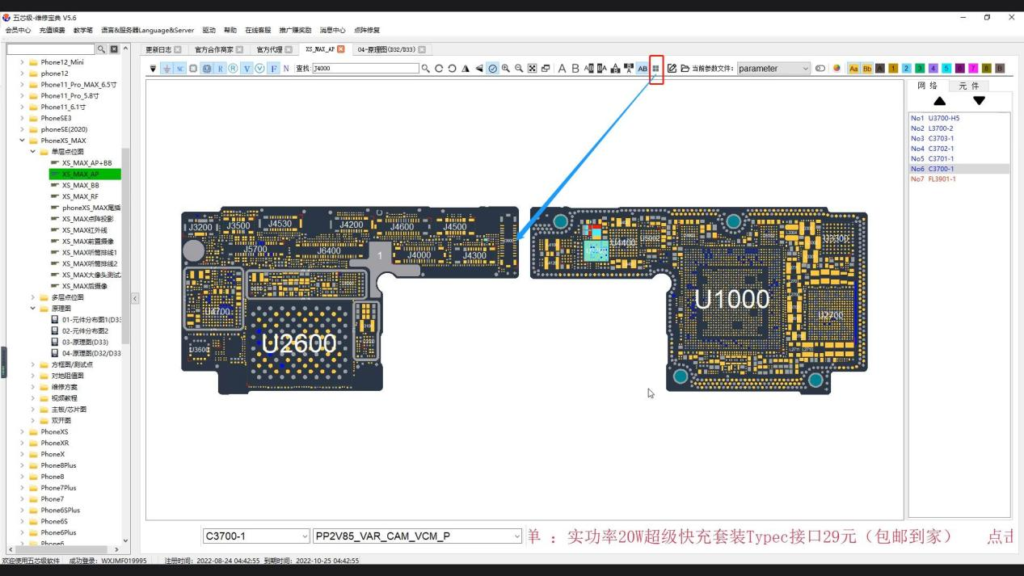
- Click the component option in the navigation bar to see the number of pads and the corresponding name of the selected component. Click the name of any pad, and the system will automatically locate the location of the pad and display the content of the pad in the prompt box
image
- Back to the network option, click a pad randomly in the dot map, and you can see a variety of colors appear in the navigation bar on the right, which indicates that the network line of the pad is connected to pads on different boards.
+
Component imageimage
- Double click the Wuxinji shortcut key to enter the login interface, and click Login
image
- Find the iPhone series options in the left list. Take the iPhone XS MAX as an example. Click in to find a single-layer bitmap, select the XS MAX AP, and click
image
- Place the cursor at the position to be mirrored, press and hold the Ctrl key with the left hand, and press and hold the left mouse button with the right hand. When the “+” sign appears at the lower right corner of the cursor, move the mouse.
image
- Place the cursor in the appropriate position, and release it to get a mirror image
image
- Place the cursor on the image map and click the right mouse button. Different options will appear. Operate according to your actual needs.
image
- If you need to move the image, find the customized location in the menu bar, click the image to be moved, and then move it